Creating a Report Layout for a Customer List in Document Creator
28 Jan 2018
Reading time ~11 minutes
As a C/SIDE developer in Microsoft Dynamics NAV, you may often be faced with developing layouts for customer-specific reports. Even though the development environment offers a quite intuitive way for defining datasets for these reports, the standard report tooling for defining their layouts, known as RDLC, proves to be much more of a hassle to work with and often makes simple list or document layouts much more complex than they need to be.
With Document Creator, however, creating or modifying custom report layouts is immensely simplified and is just a matter of minutes instead of hours! Through the intuitive report designer and the separation of report-logic and layout/presentation also end-users without technical knowledge can make simple changes. Also, Document Creator ships with a set of template layouts for the most-used standard reports (e.g., invoices, orders, etc.), which can get you started even faster!
Even though most of the time you’ll only want to make customizations of existing report layouts, sometimes you also might want to develop layouts for new report-objects. Therefore, in this blog I would like to show how easy it is to create a new report layout for a simple list report from scratch, which includes some simple examples of grouping and defining totals in Document Creator report layouts.
Definition of the Dataset in C/SIDE in the “Customer List” Report Object
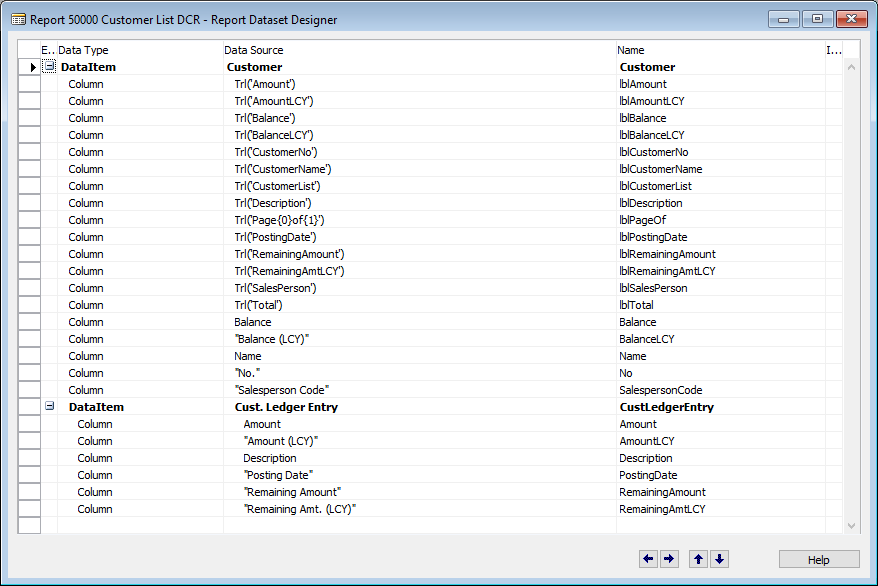
For this demo I have created a custom report object, R50000 “Customer List DCR”, defining the dataset for a “Customer List” report, loosely based on the standard R101 “Customer List” leaving out some fields to keep everything more clear. Of course, you could just as well take the standard “Customer List” report object as the base for your report dataset if you want to. That is, we will define the layout for our report object separately, in the “Custom Report Layouts” page, so that it is possible to easily switch between any existing default RDLC or Word layout and custom Document Creator layout whenever we want.
But first, let’s take a short look at the definition of the report dataset for our Customer List report in the C/SIDE report object. First off, we see that the dataset consists of fields from the Customer table (e.g., Balance, Name, “Salesperson Code”) and fields from the Cust. Ledger Entry table (e.g., Amount, Description, “Posting Date”) for the customers in the dataset.
Translations
Secondly, we see that the Customer data item of the dataset also holds a collection of labels for these fields, which have an “lbl”-prefixed column name (e.g., the “lblAmount” column is a label for the Amount field). These labels in the dataset are filled based on the Document Creator Translations module, which retrieves the translations for the labels/captions as they are defined on the “Document Creator Translations” page. Note that Document Creator ships with a package containing a set of standard translations, which you can find in the TEMPLATE folder contained in the .zip file with the Document Creator installation files available at document-creator.com/downloads.
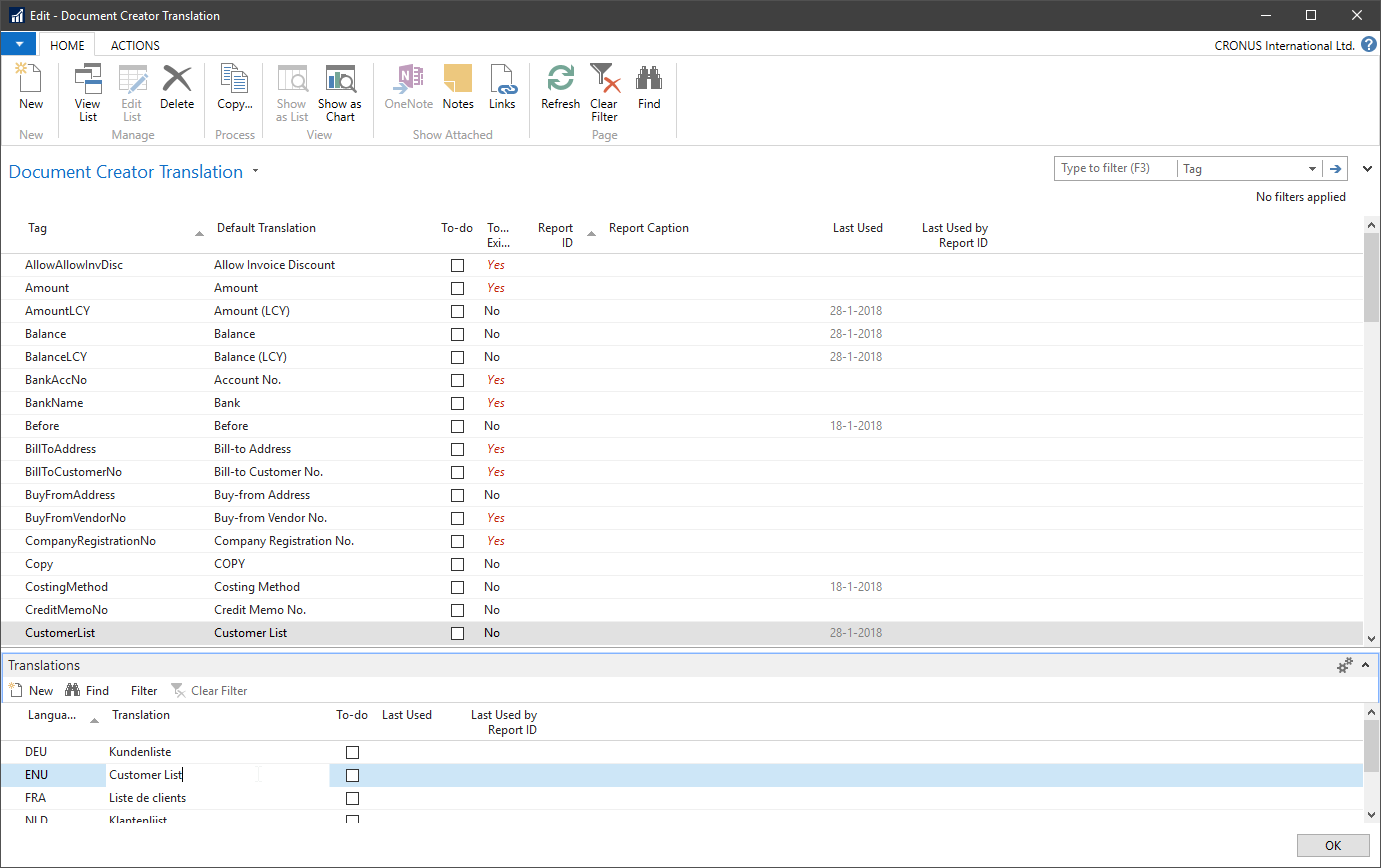
After importing and applying this package you will find these translations in the “Document Creator Translations” page shown below, where you can customize the captions for your reports at any time and even specify report-specific translations. The major advantage is that you can thus easily change and customize the captions for your reports without a developer license. If no translation is defined for a label on this page for some language, then the “Default Translation” for that label will be used.
Note that if you create a new report, with new captions that use the Document Creator Translations module, new entries for the labels will be added automatically to the “Document Creator Translations” page. For instance, in our R50000 C/SIDE report object, we have defined a datacolumn lblCustomerList with source expression Trl('CustomerList'), which means that the report layout will use the translation with tag “CustomerList”. As no translation with this tag exists by default, a new translation will be generated when the report is run, with default translation “#CustomerList”. As shown in the screenshots below, we can edit the newly generated translation entries on the Document Creator Translations page.
Creating a New Report Layout in the “Custom Report Layouts” Page
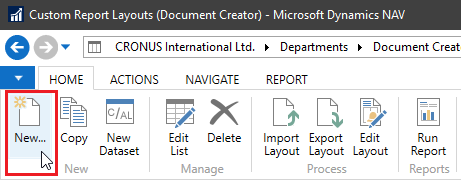
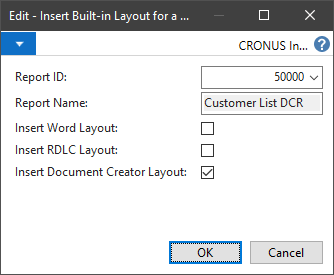
Having the dataset for our layout, defined through the C/SIDE report object, we can create a new Document Creator report layout through the “Custom Report Layouts (Document Creator)” page. As said, we will be creating a report layout from scratch, which can be done by opening this page and pressing the “New…” button. This opens up a dialog where you can specify the report object to use, and where you can specify what type of custom layout you want to create. To create a blank Document Creator layout for our custom report, we set the “Report ID” to 50000, check the “Insert Document Creator layout” option and press the “OK” button in this dialog. After that, we see that a new entry appears in the page with description “Document Creator Layout”, which holds a blank Document Creator layout for our customer list report. Note that you can edit the description of this layout in the page from the default “Document Creator Layout” to something more descriptive, e.g., changing it to something like “Customer List Layout DCR”.
Editing the Layout in the DCR Report Designer
To edit the new layout, we have two options in the “Custom Report Layouts (Document Creator)” page:
- Edit Layout: Selecting this option will open the Document Creator report designer for this layout without any live data for previewing.
- Edit Layout (with Data): Selecting this option will open the Document Creator report designer for this layout after configuring options and setting filters in the request page, so that you can edit the layout and preview your changes with live data.
In most cases, you probably want to pick the second option, so that you can preview the effect of your changes to the layout with actual data. With the Document Creator report designer open, you can preview your layout by pressing the “Preview” button (Ctrl + F5).

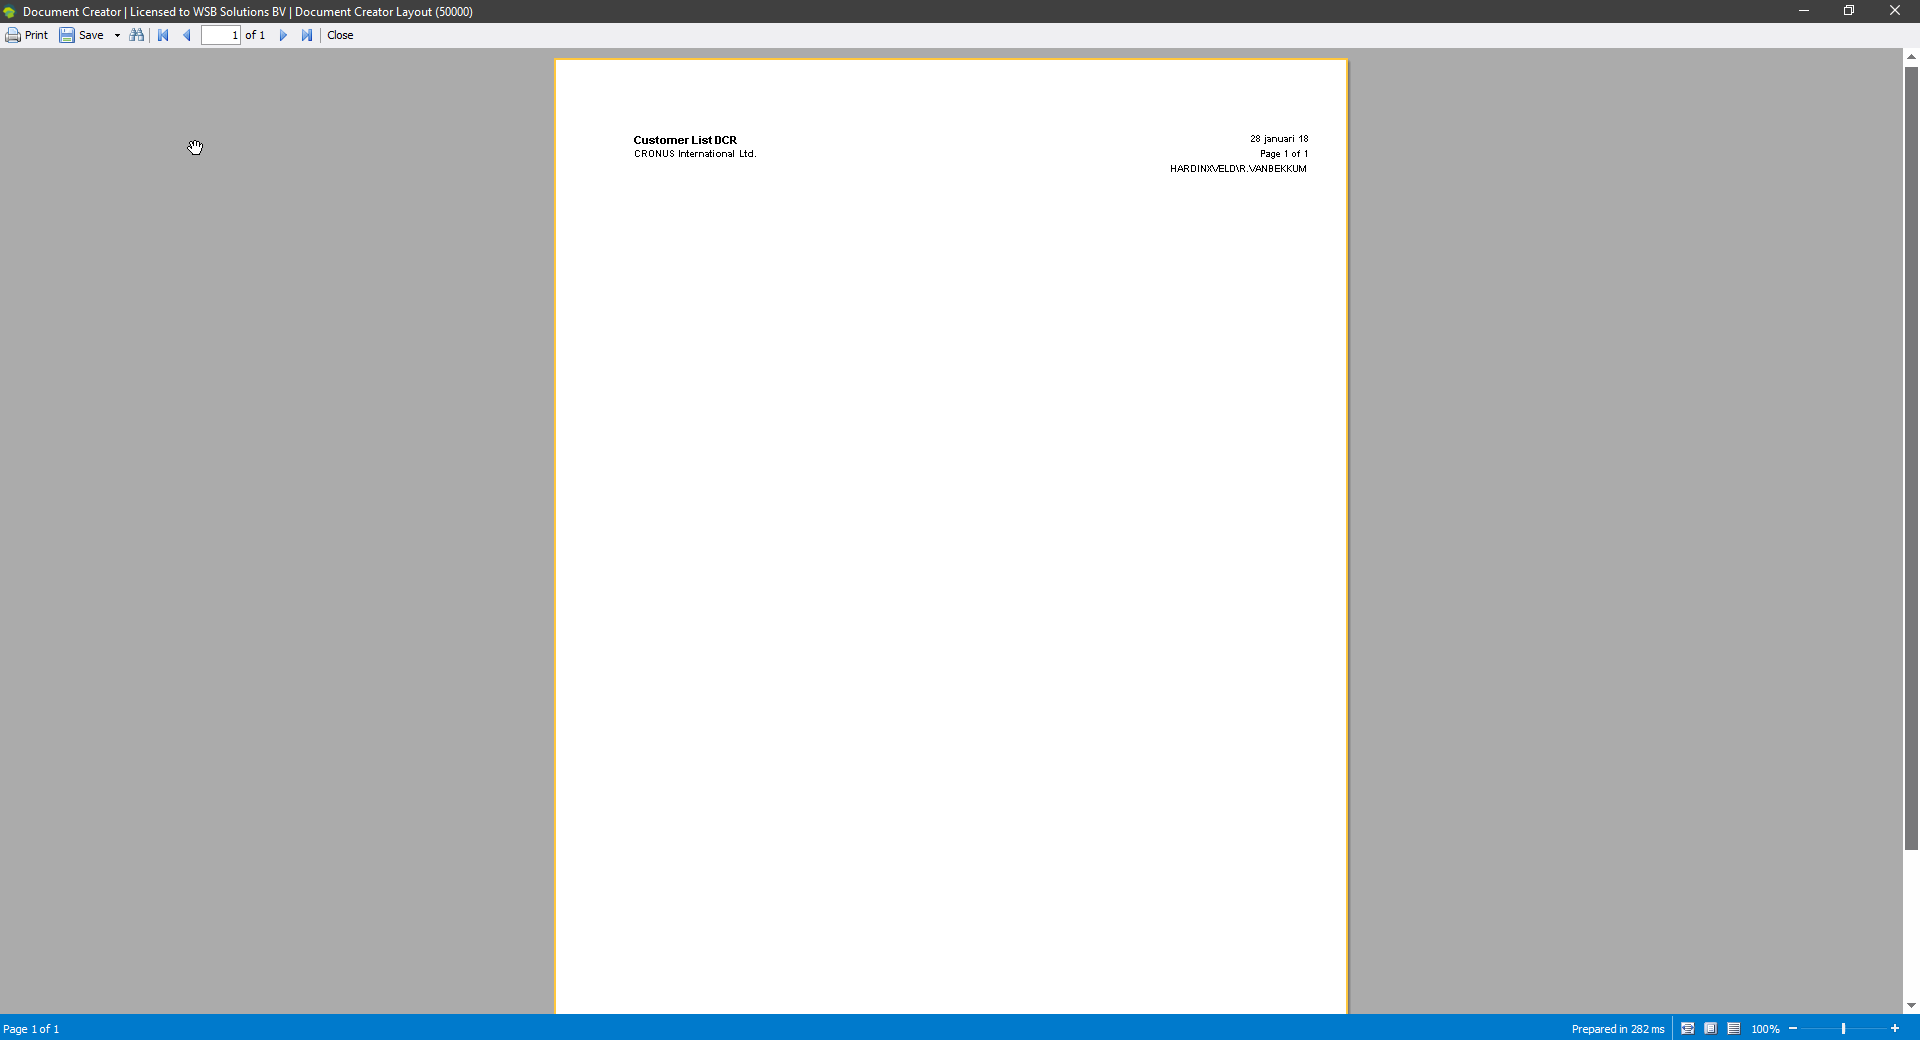
Opening the Document Creator report designer for our new layout shows us the default layout, which has a “PageHeader” band, and a “DataBand” for each Data-Source (i.e., for the “Customer” and “CustomerLedgerEntry” data items).
Step 1: Showing the list of customers with non-zero balance
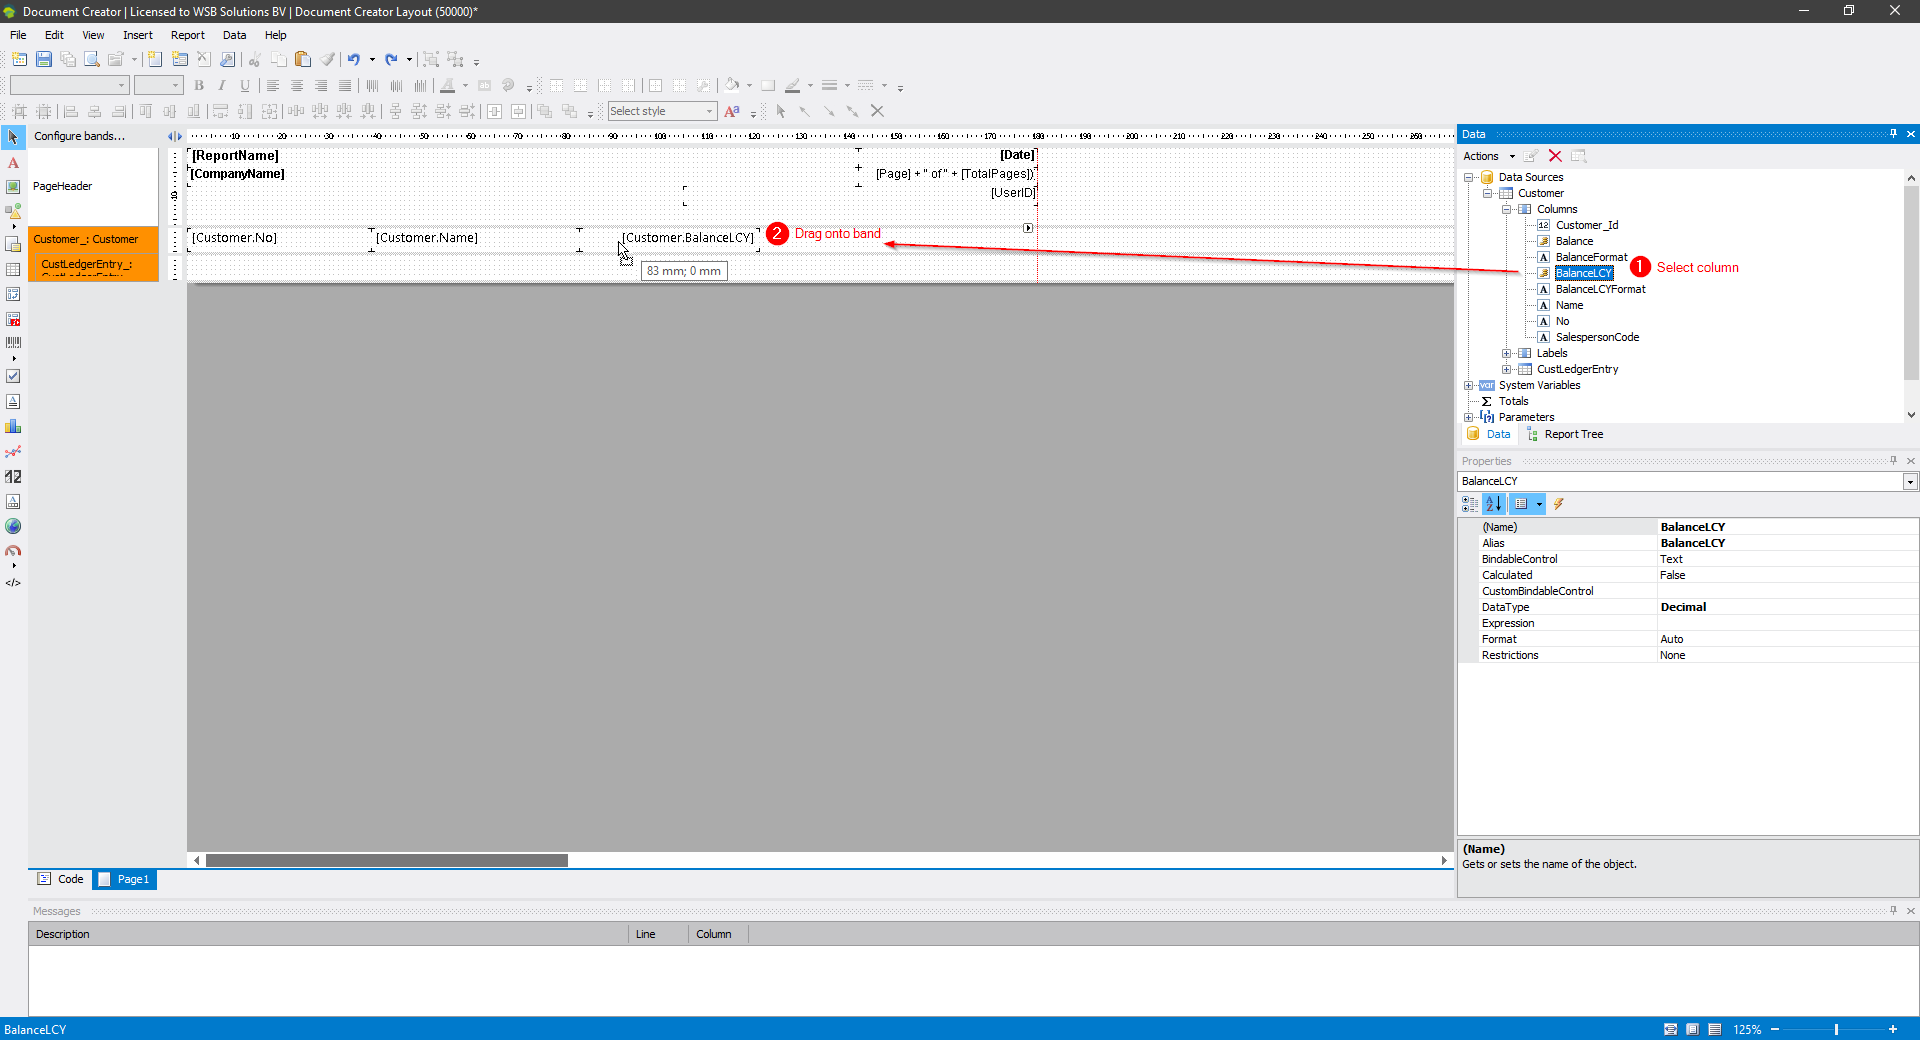
First, we add fields from the Customer datasource are placed on the corresponding DataBand in a TextObject, so that there will be a row for each customer with its No., Name and Balance (LCY). This can be done by simply dragging columns from the “Data” window on the right, under “Data Sources | Customer | Columns”, onto the DataBand:
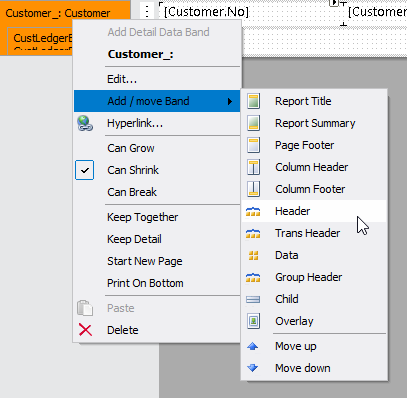
Next, we add a HeaderBand to show captions above the fields we just added to the Customer DataBand. We can add a Header- and FooterBand for the customer data by pressing the right mouse button on the Customer_ DataBand and choosing “Add / move band | Header”. Next, we can add the labels by again simply dragging them from the “Data” window on the right, under “Data Sources | Customer | Labels” onto the HeaderBand:
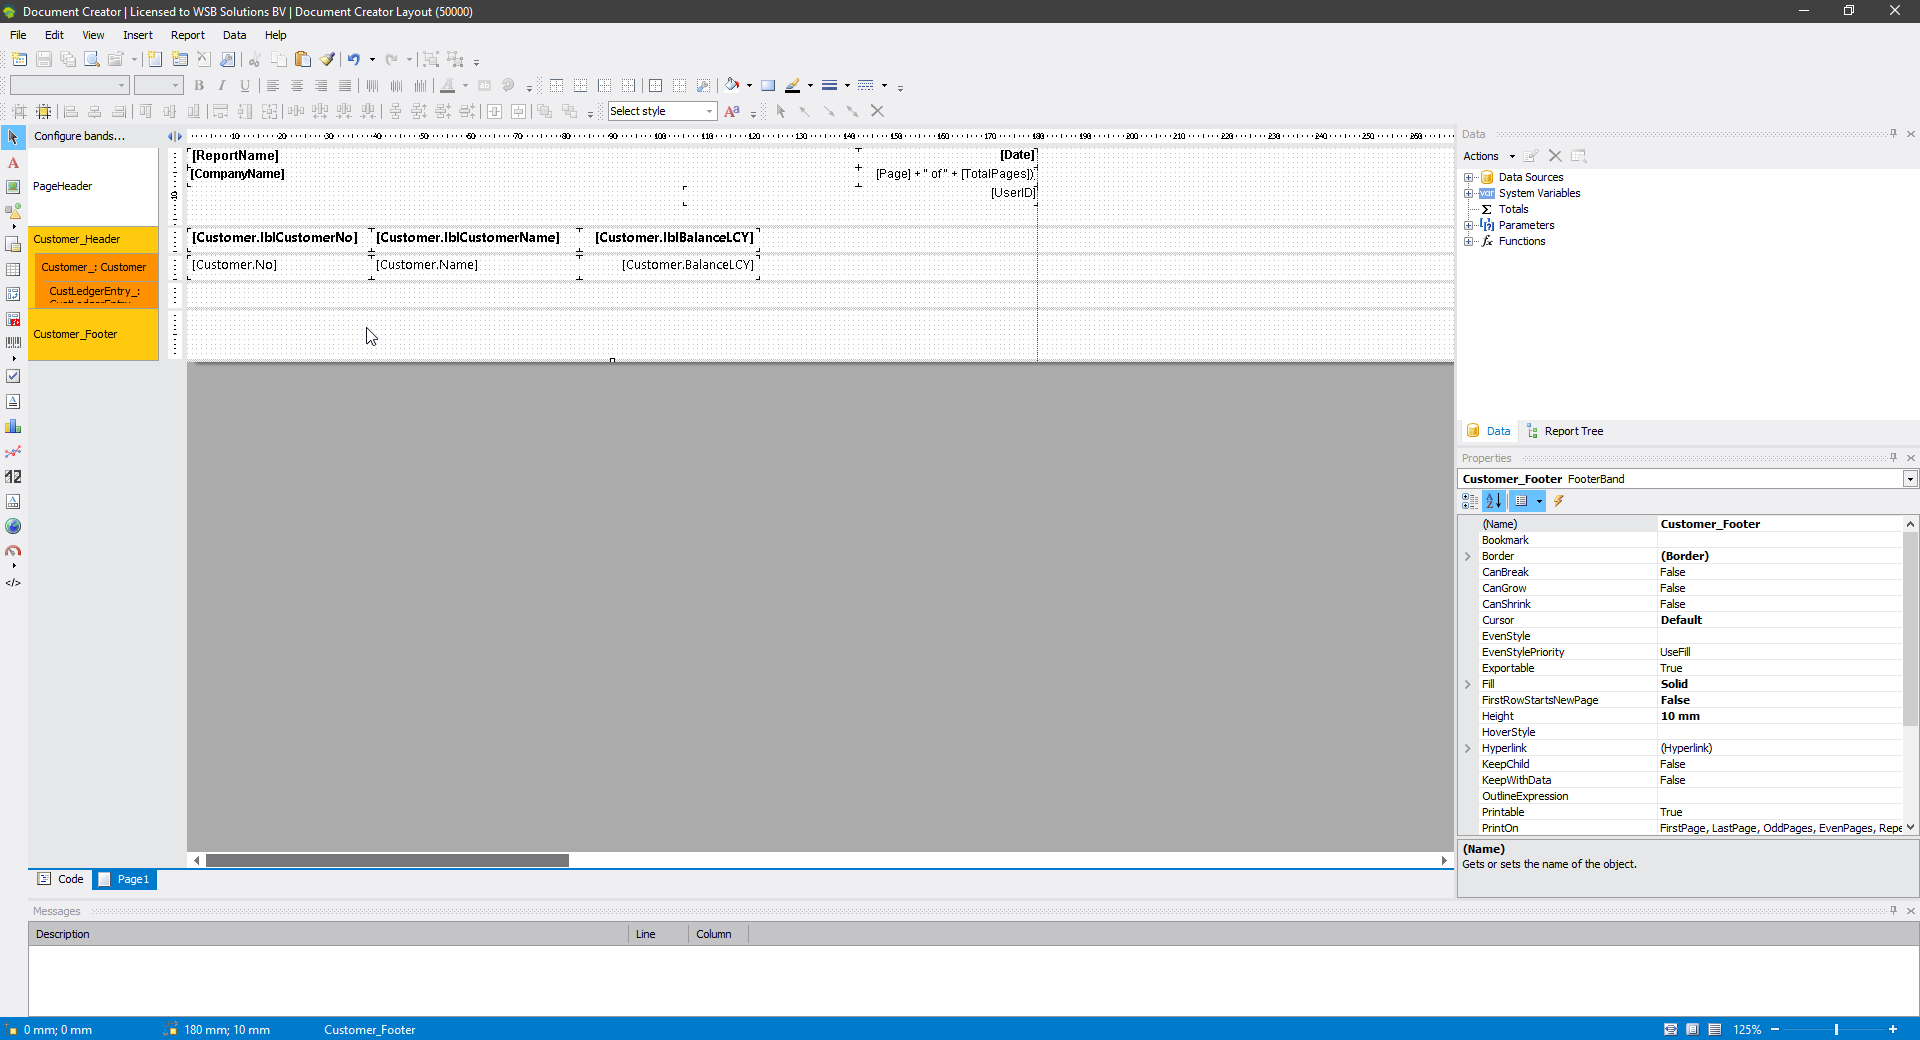
Now, we can again preview the layout by pressing the “Preview” button (Ctrl + F5):
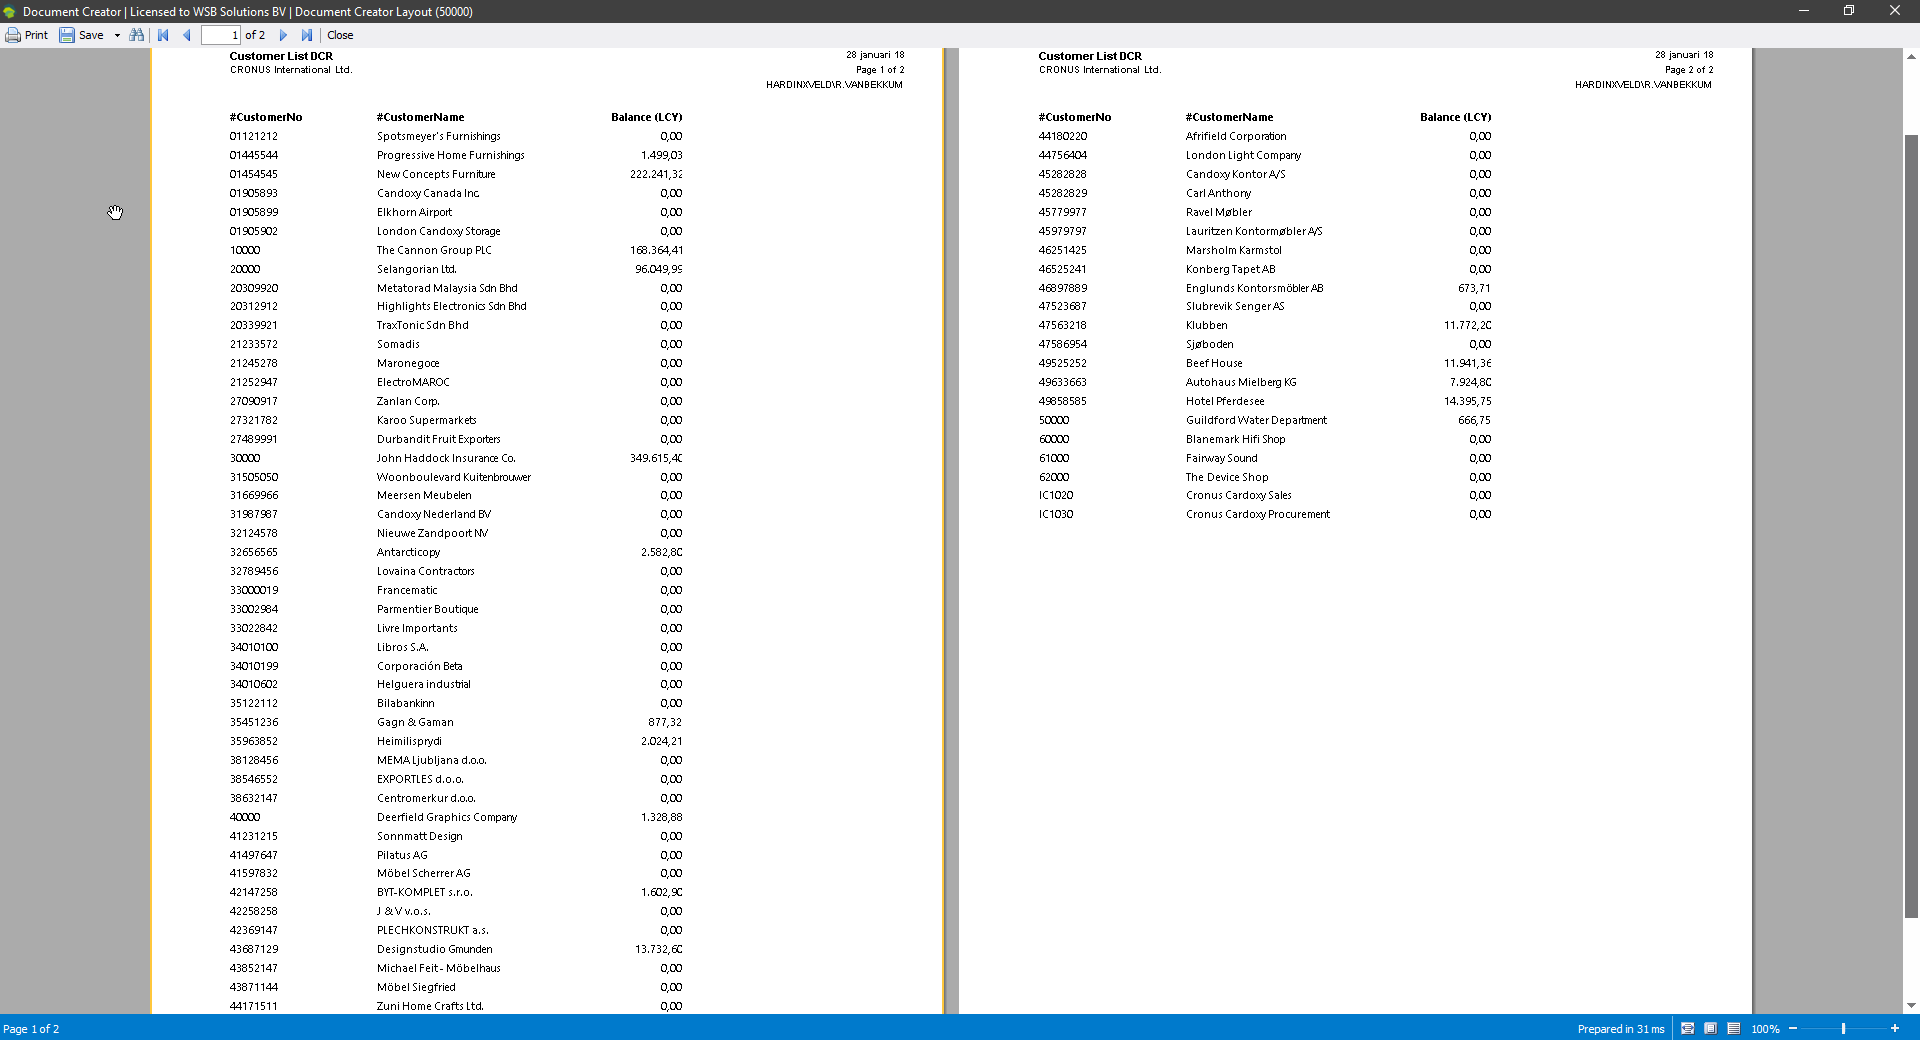
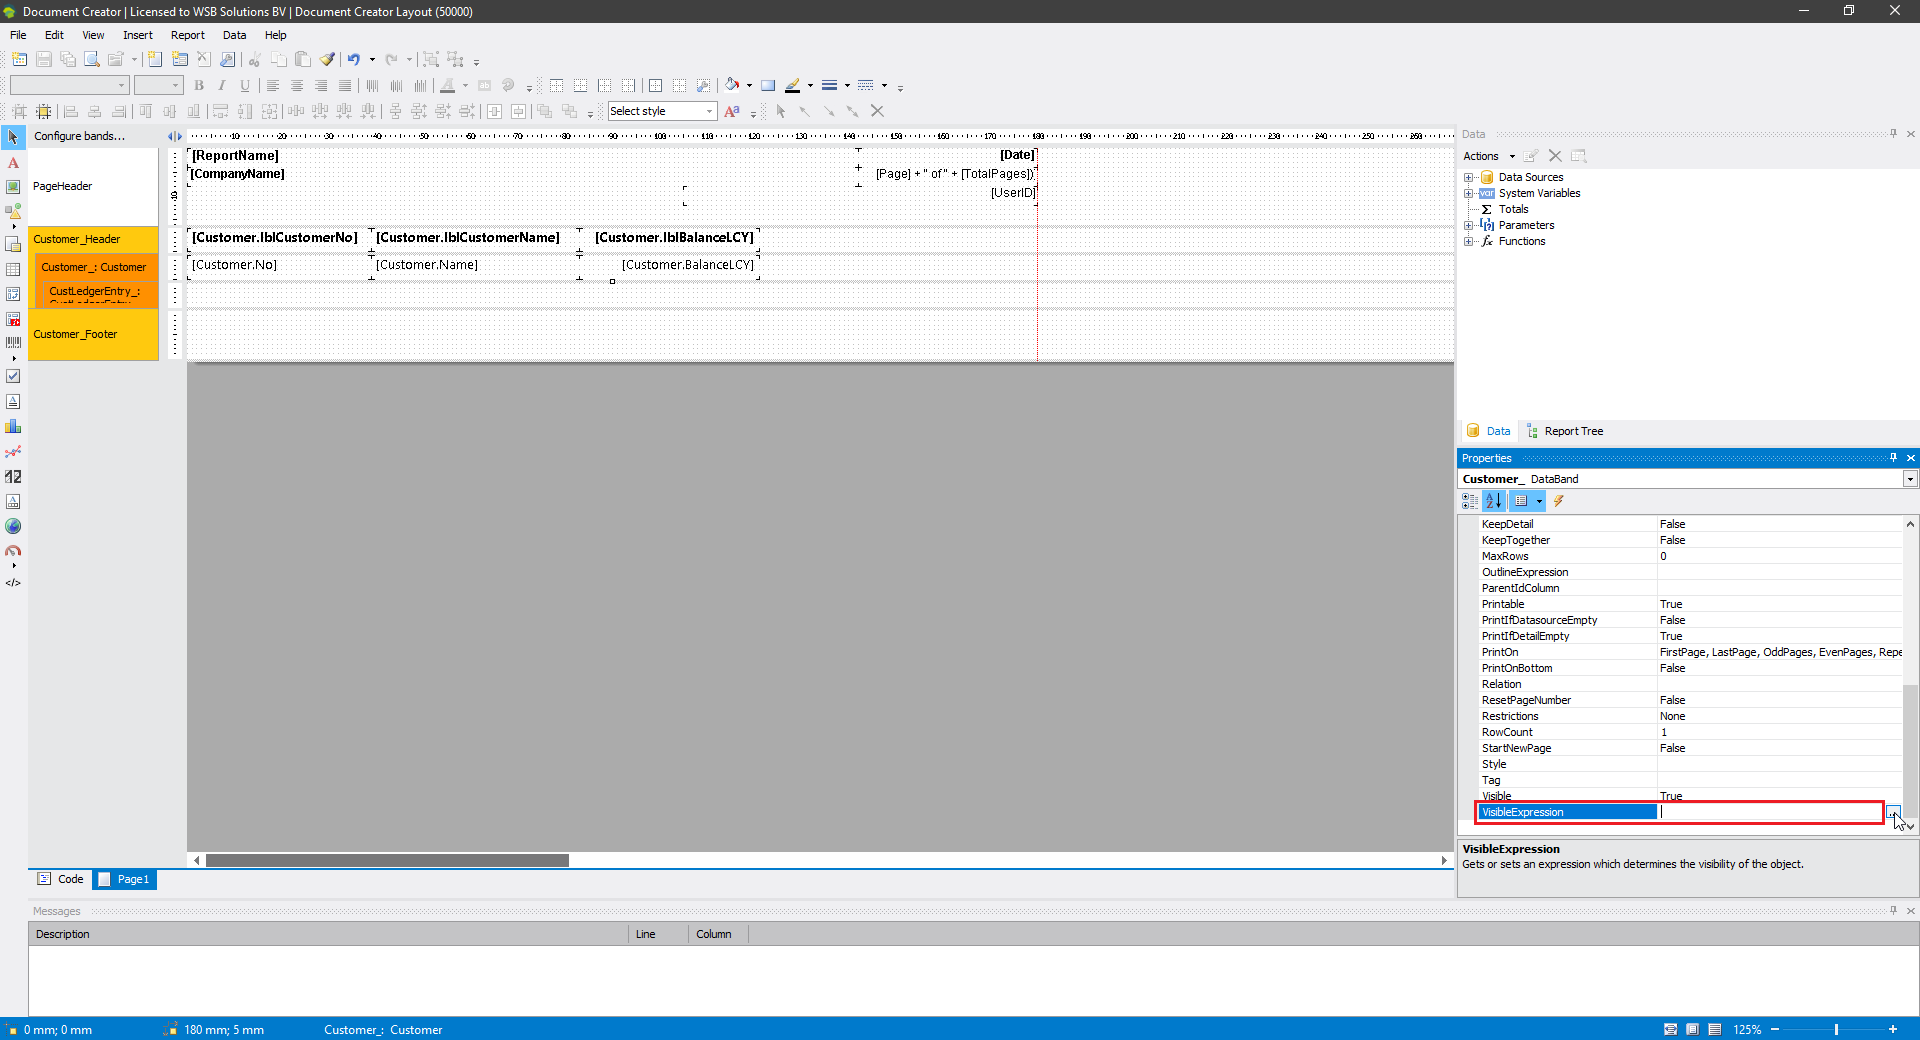
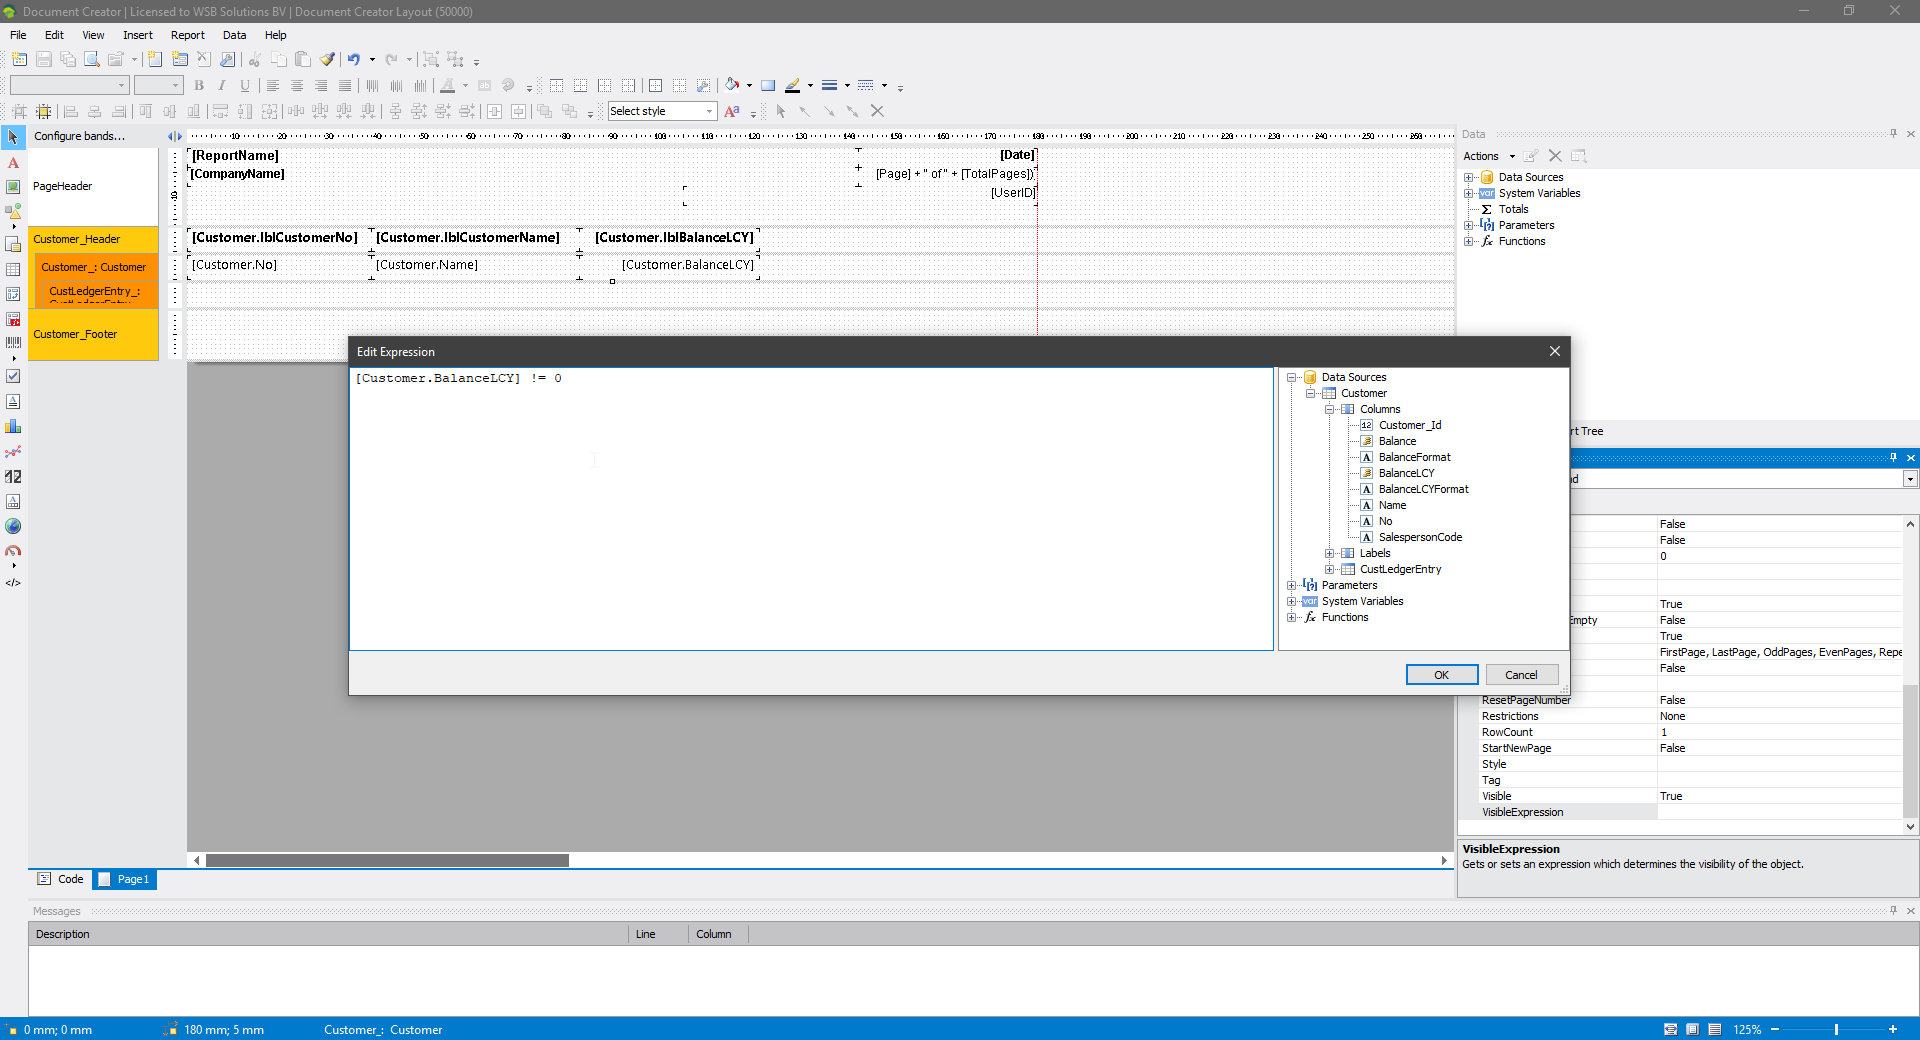
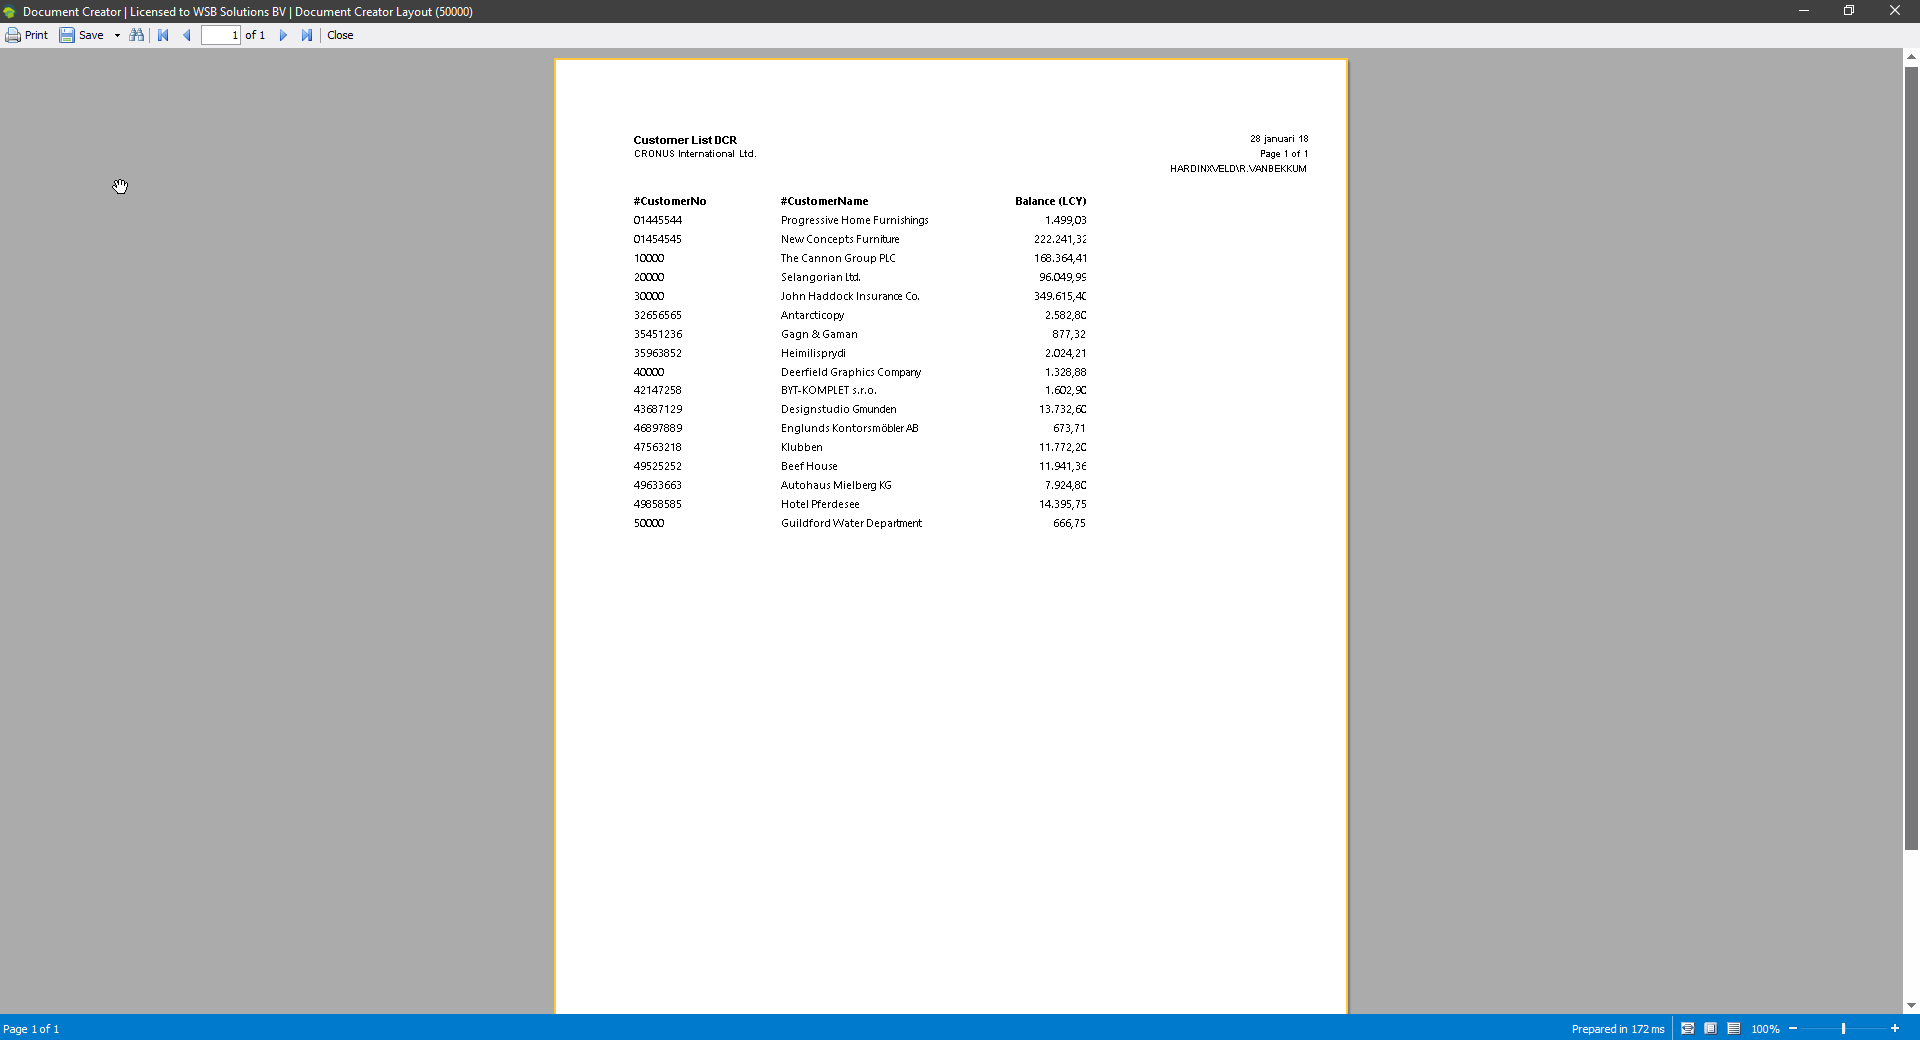
What we notice though, is that also customers are shown that have a balance that equals zero. Let’s say we do not want to show these customers in our report. To change this, we can change the “VisibleExpression” property of the “Customer_” databand, so that the band contents will only be displayed when the “Balance (LCY)” for the customer is not equal to zero. This means that we set the “VisibleExpression” property for the databand to [Customer.BalanceLCY] != 0, as shown in the screenshots below:
Step 2: Showing the total sum of the balance of all customers
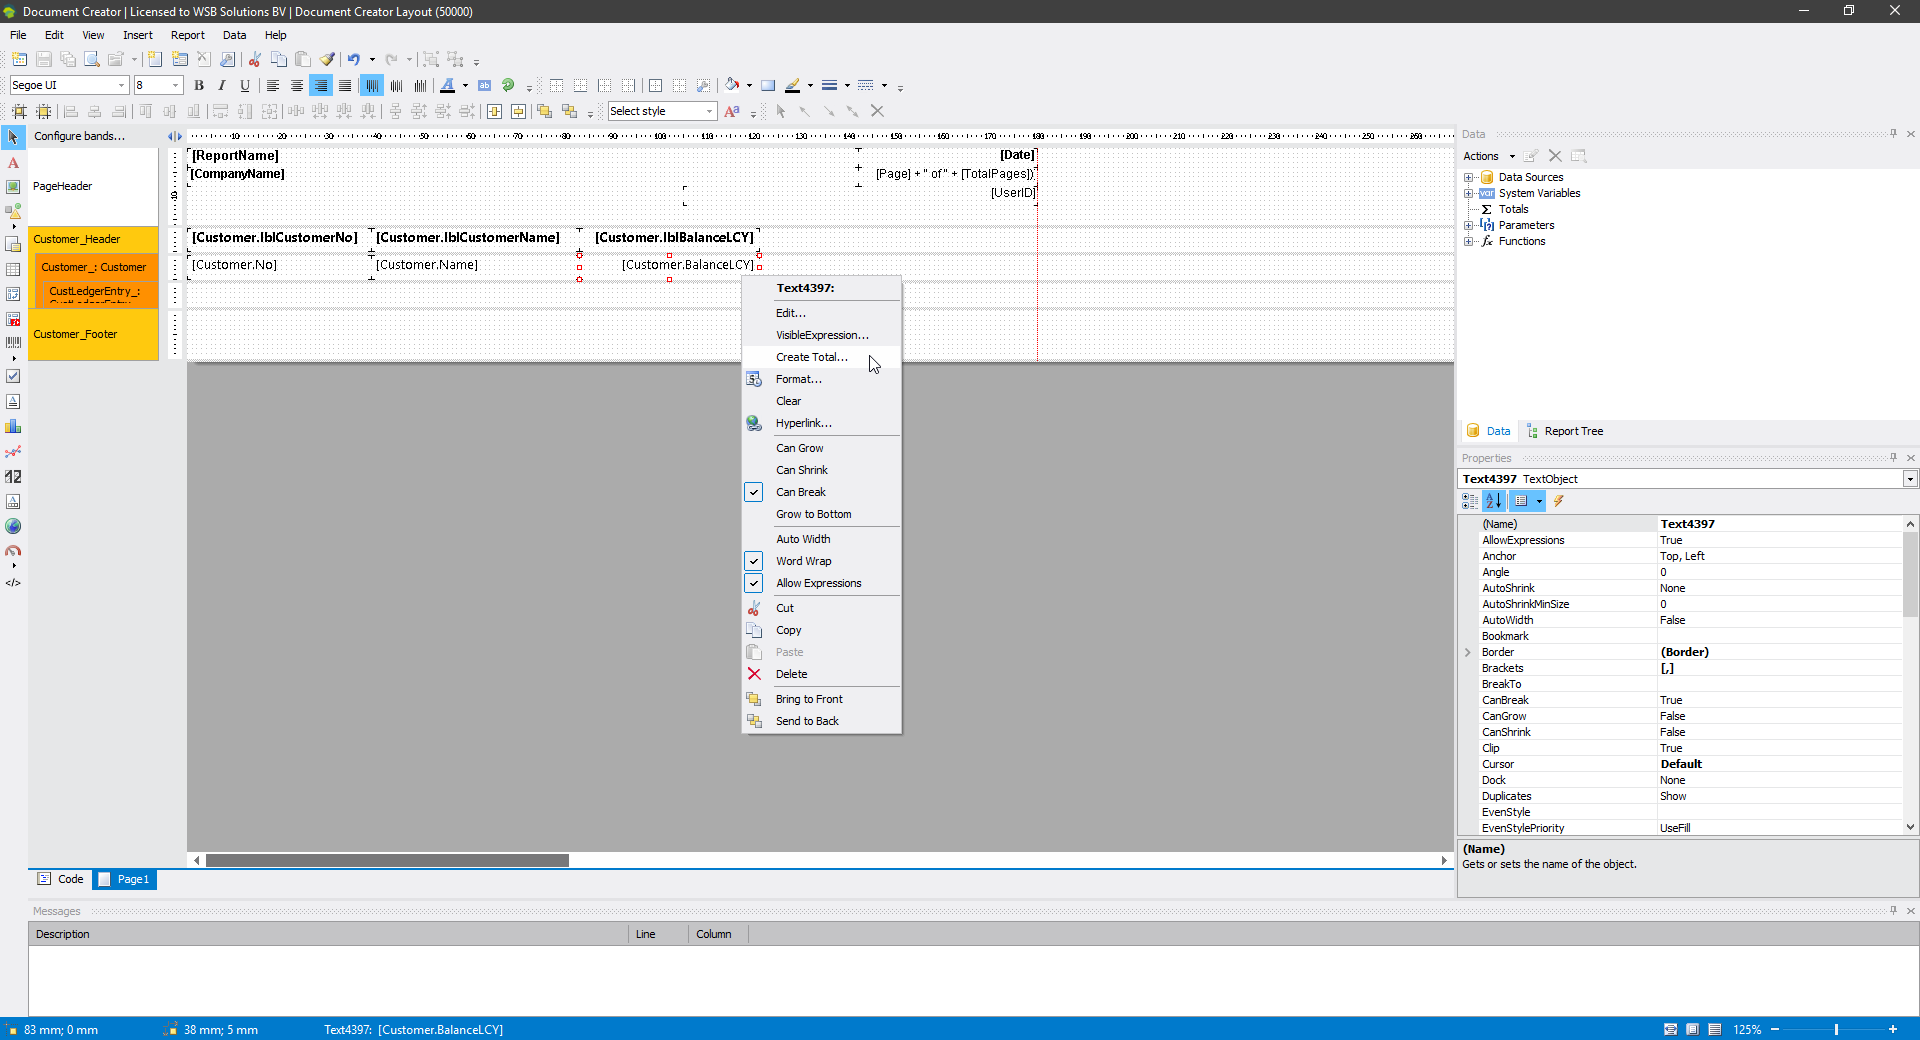
The next thing we are going to add, is an overall total of the balance over all customers. To assist you with this, Document Creator has the option to generate totals from a TextObject you placed on your report layout earlier. To create a total for the BalanceLCY field, you can follow the following steps:
- Create a new TextObject for the total from the existing TextObject on the Customer_ databand:
- Put the cursor on top of the TextObject on the Customer_ databand with expression “[Customer.BalanceLCY]”
- Press the right-mouse button.
- Select “Create Total…” from the context-menu that appears, which will create a new text-object
- Drag the new TextObject on the Customer_Footer footerband.
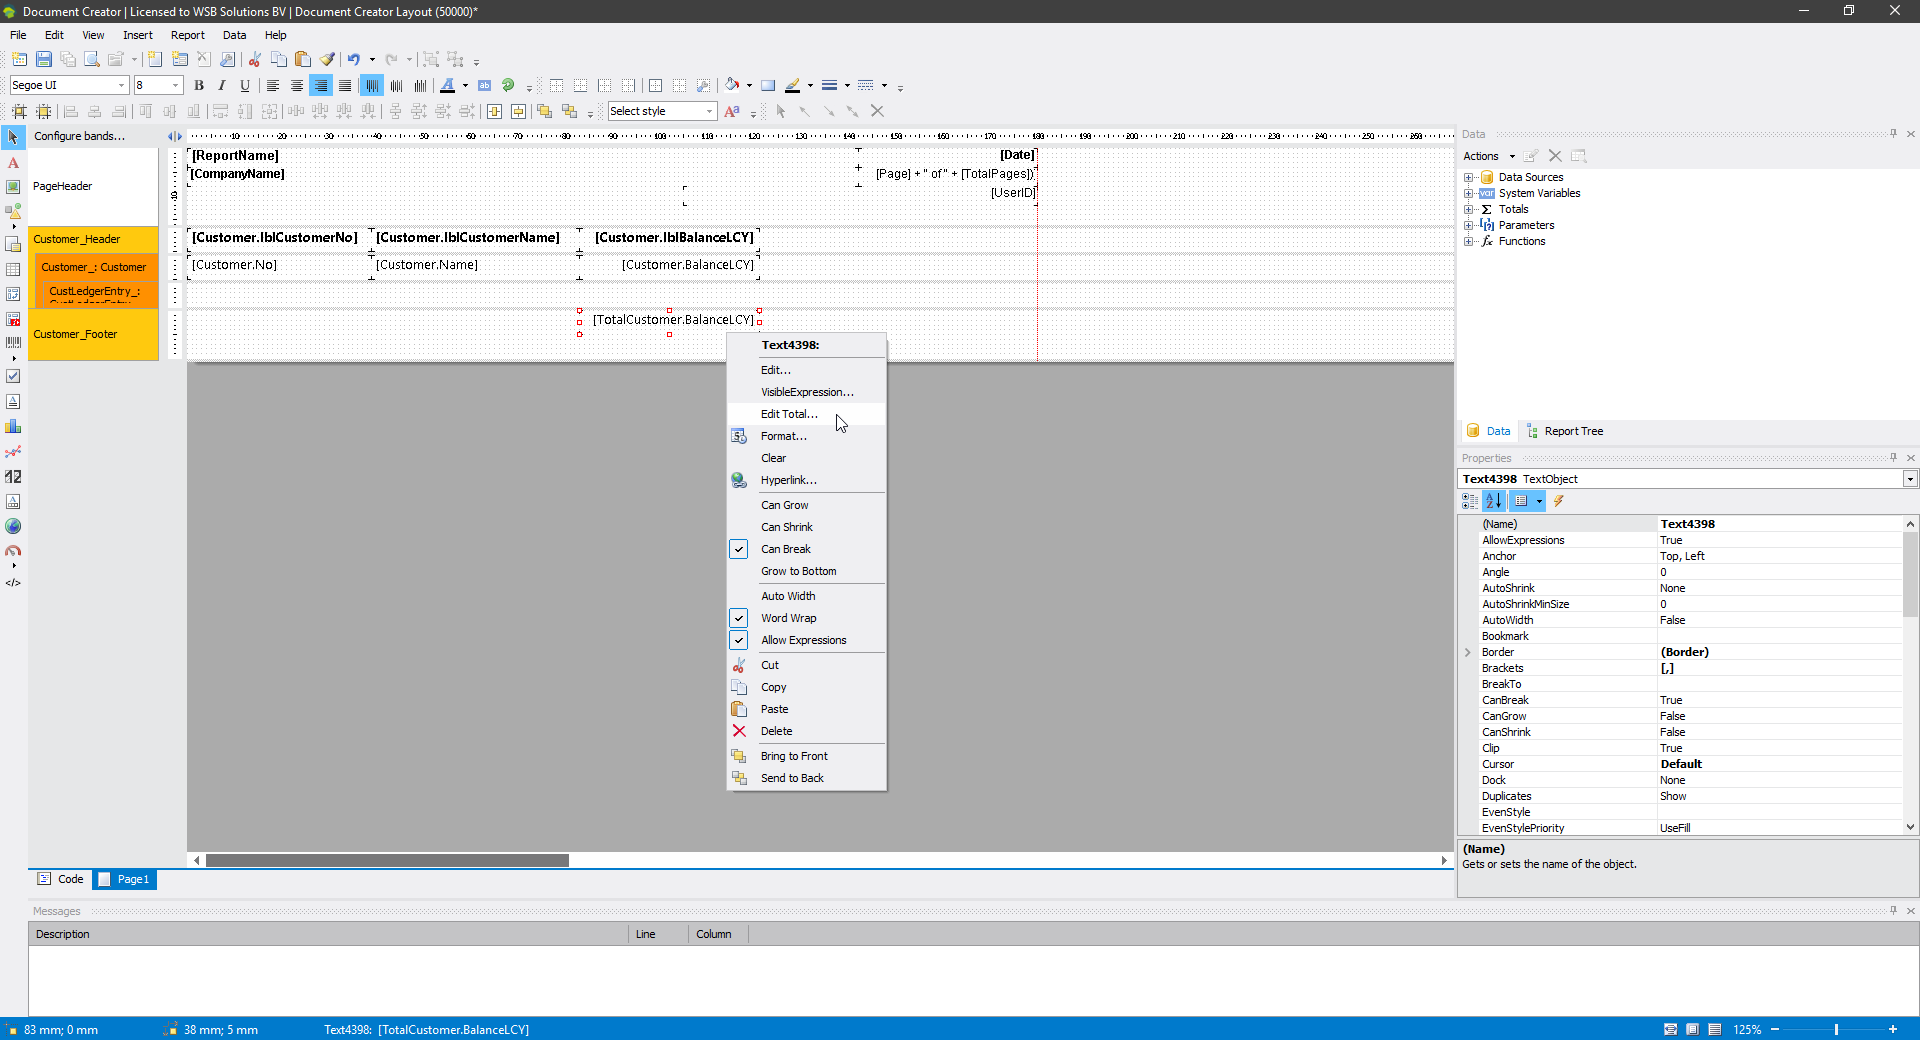
- Open up the “Edit Total” window to change the configurations for the total
- Put the cursor on top of the new TextObject with expression “[TotalCustomer.BalancyLCY]”
- Press the right-mouse button
- Select *Edit Total…” from the context-menu that appears
- In the “Edit Total” window, make changes to your liking, and set “Reset on band” to the band that will be used to set the running total back to 0.
- Press “OK” to close the “Edit Total” window and save the changes.
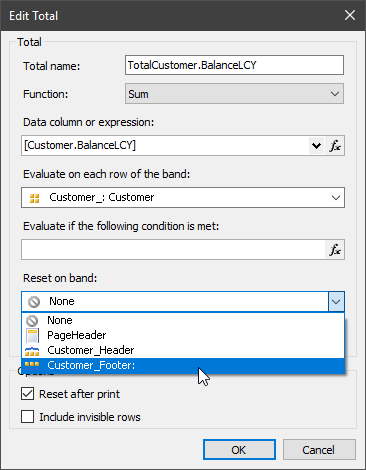
NOTE: As the TotalCustomer.BalanceLCY total will only be shown once it is not really necessary to change the “Reset on band” property. However, when you are creating or editing a multi-document layout you may need to properly set this property to get the correct total for each document.
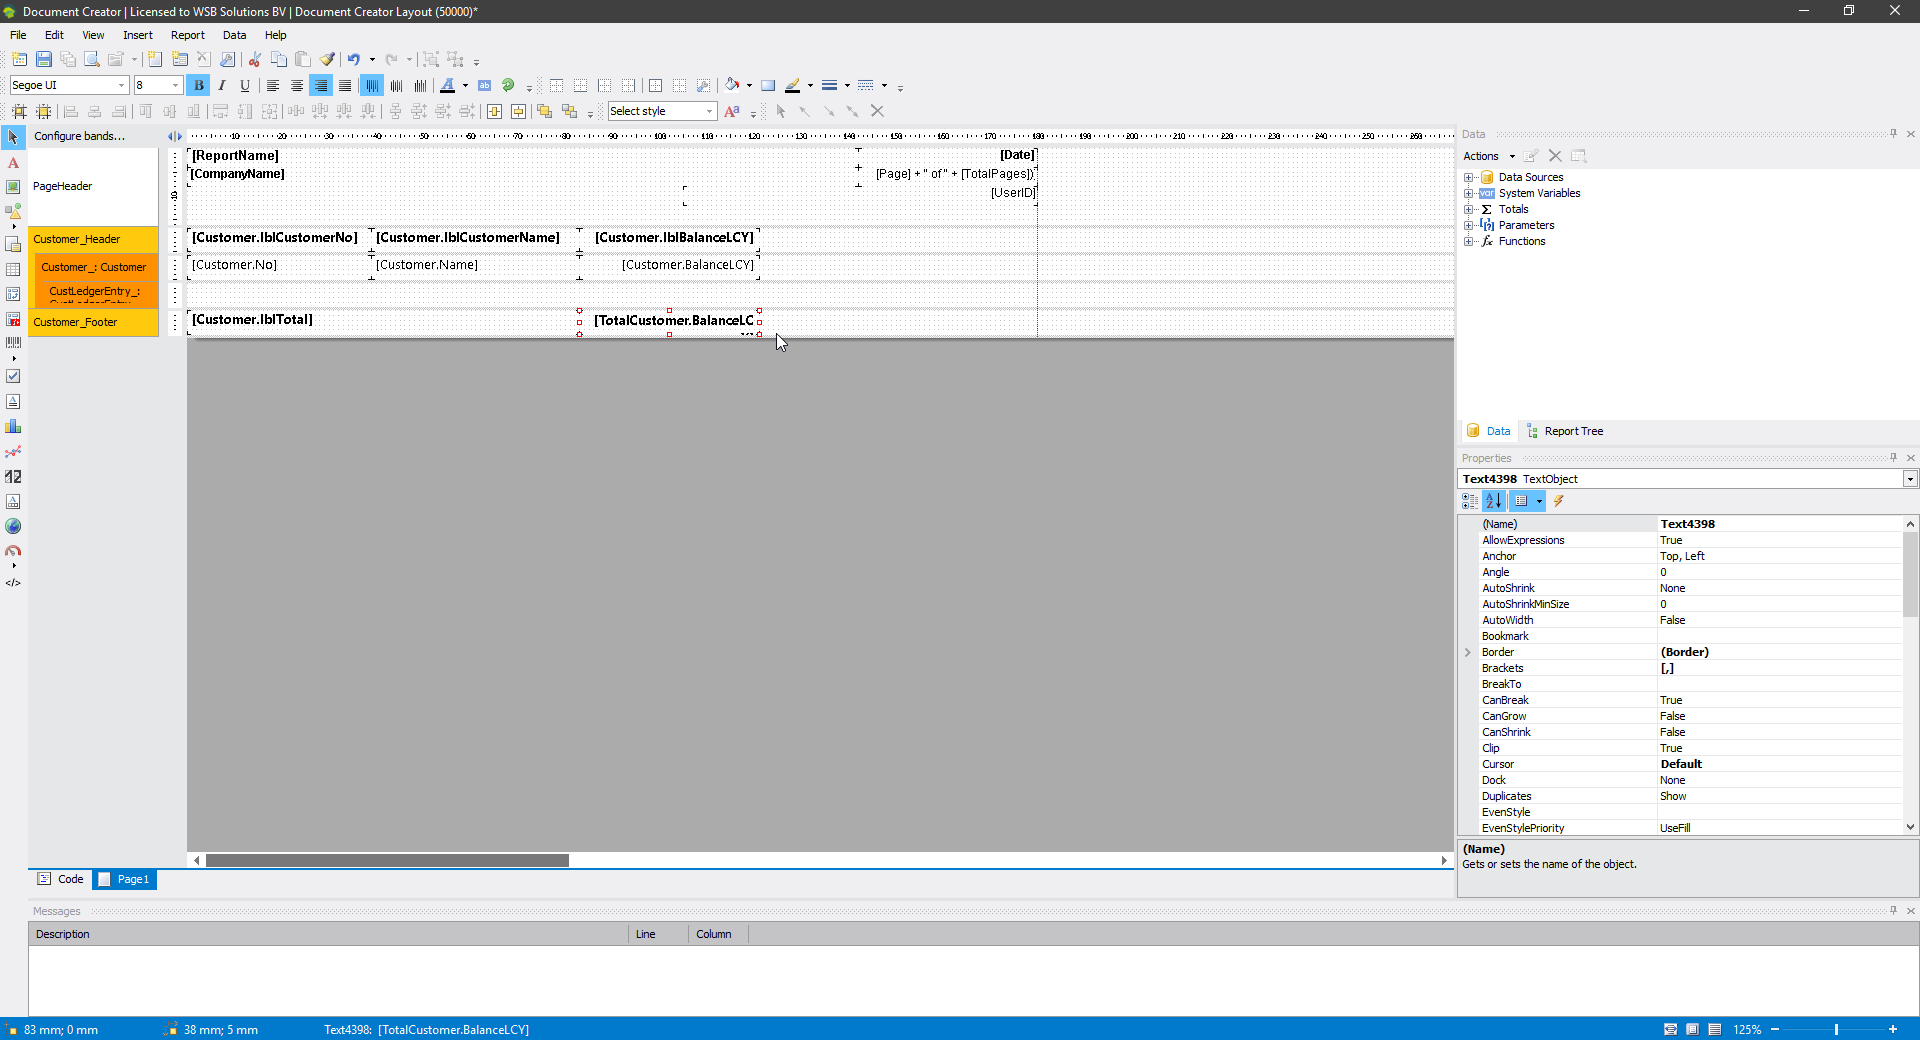
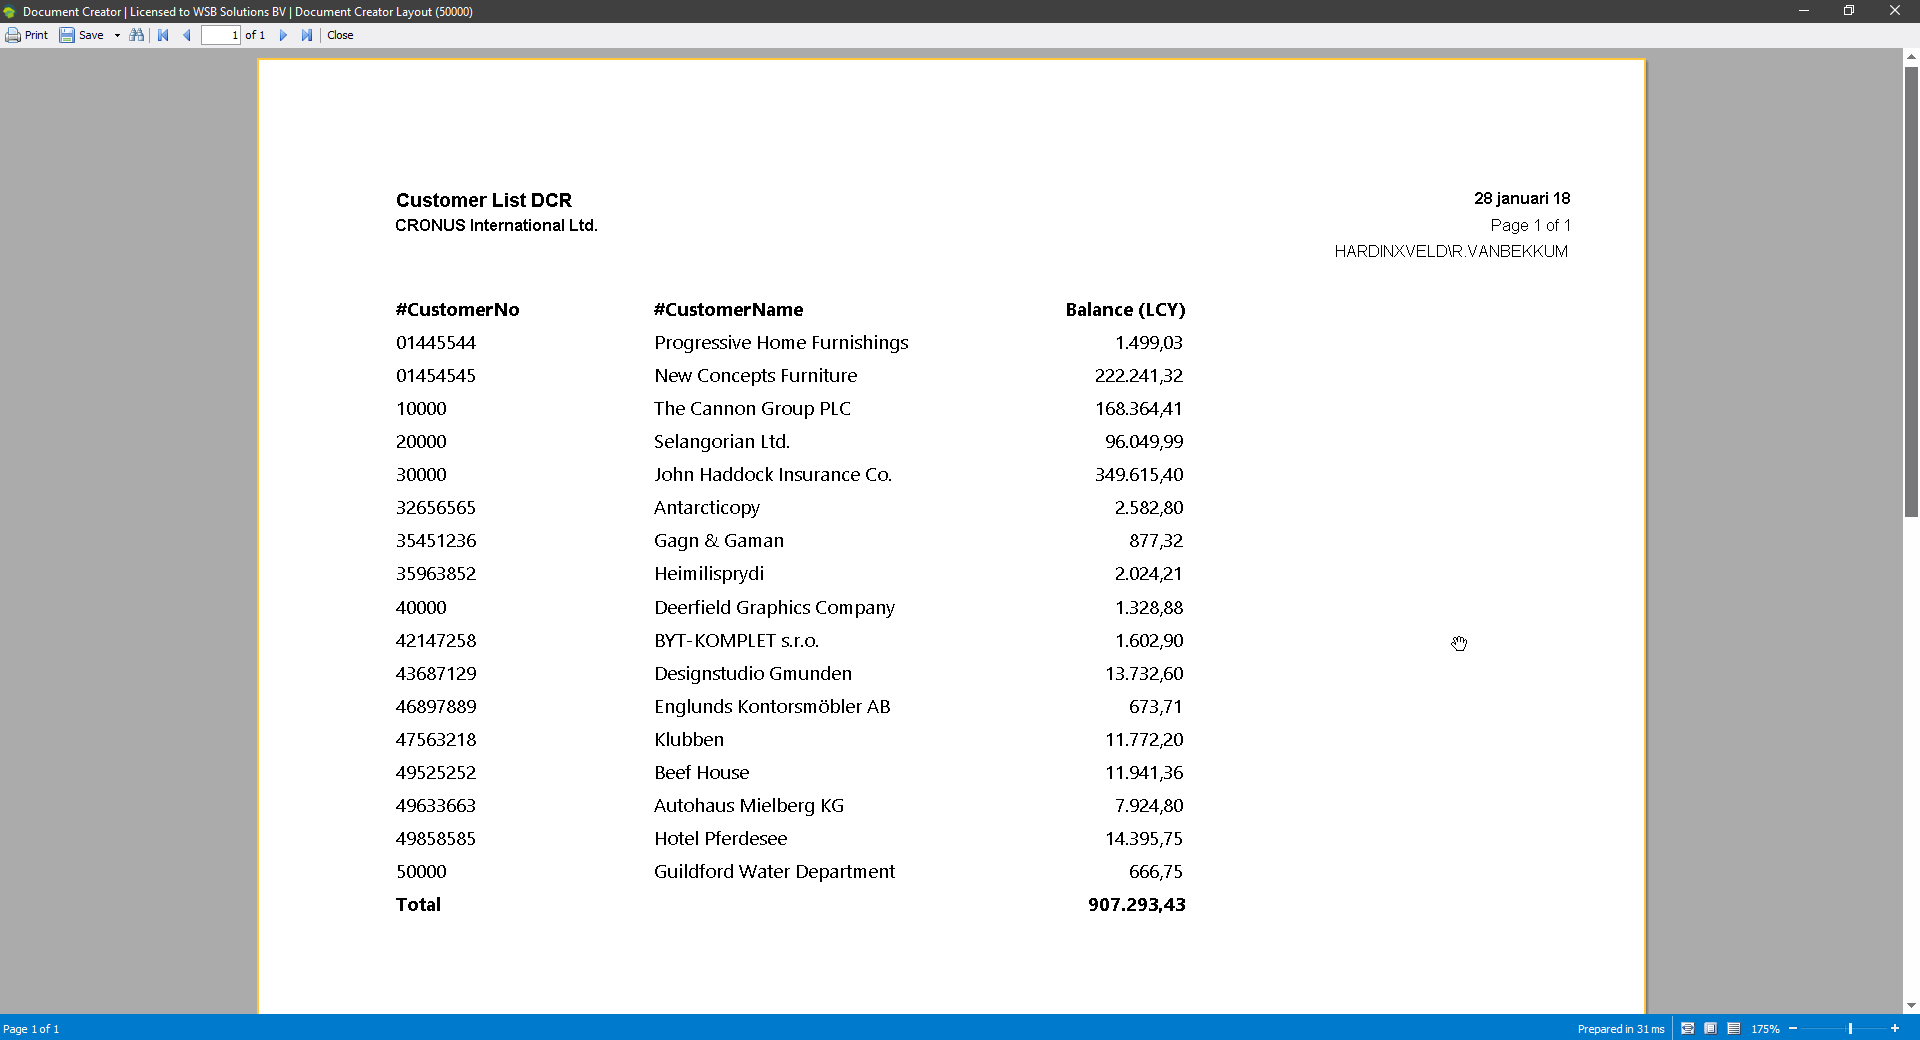
The result will look as shown in the screenshots below. Note that you can always preview your changes using the “Preview” button (shortcut: Ctrl + F5).
Step 3: Grouping the customers on salesperson
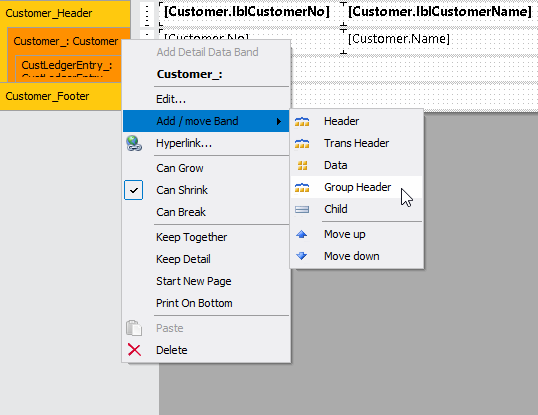
Next we will be grouping the customer by their salesperson. This is done by creating a GroupHeaderBand for the Customer_ databand. To add the GroupHeader that will group the rows by salesperson, follow these steps:
- Add the GroupHeaderBand to the report layout
- Put the cursor on top of the Customer_ databand and press the right-mouse button
- Select “Add / move Band” | “Group Header” from the context-menu that appears
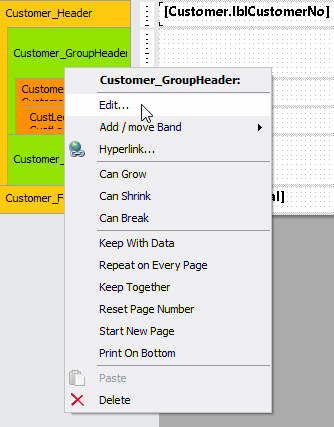
- To set the field on which to group, do the following to open the “Edit Group” window:
- Put the cursor on top of the Customer_GroupHeader band and press the right-mouse button
- Select “Edit…” from the context-menu that appears
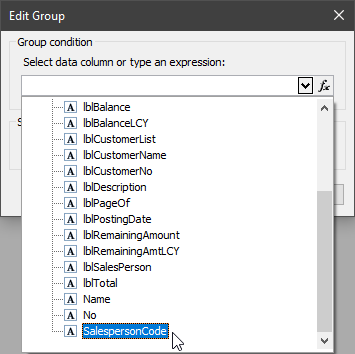
- Change the Group condition by pressing the drop-down button and selecting the “SalespersonCode” column. Press “OK” to close the window.
Now we have added a grouping on the salesperson field. In order to add a group-total we can repeat the same procedure as in the previous step, but instead we will set the “Reset on band” property for the newly generated total to the “Customer_GroupFooter” band. The result will look as shown in the screenshots below:
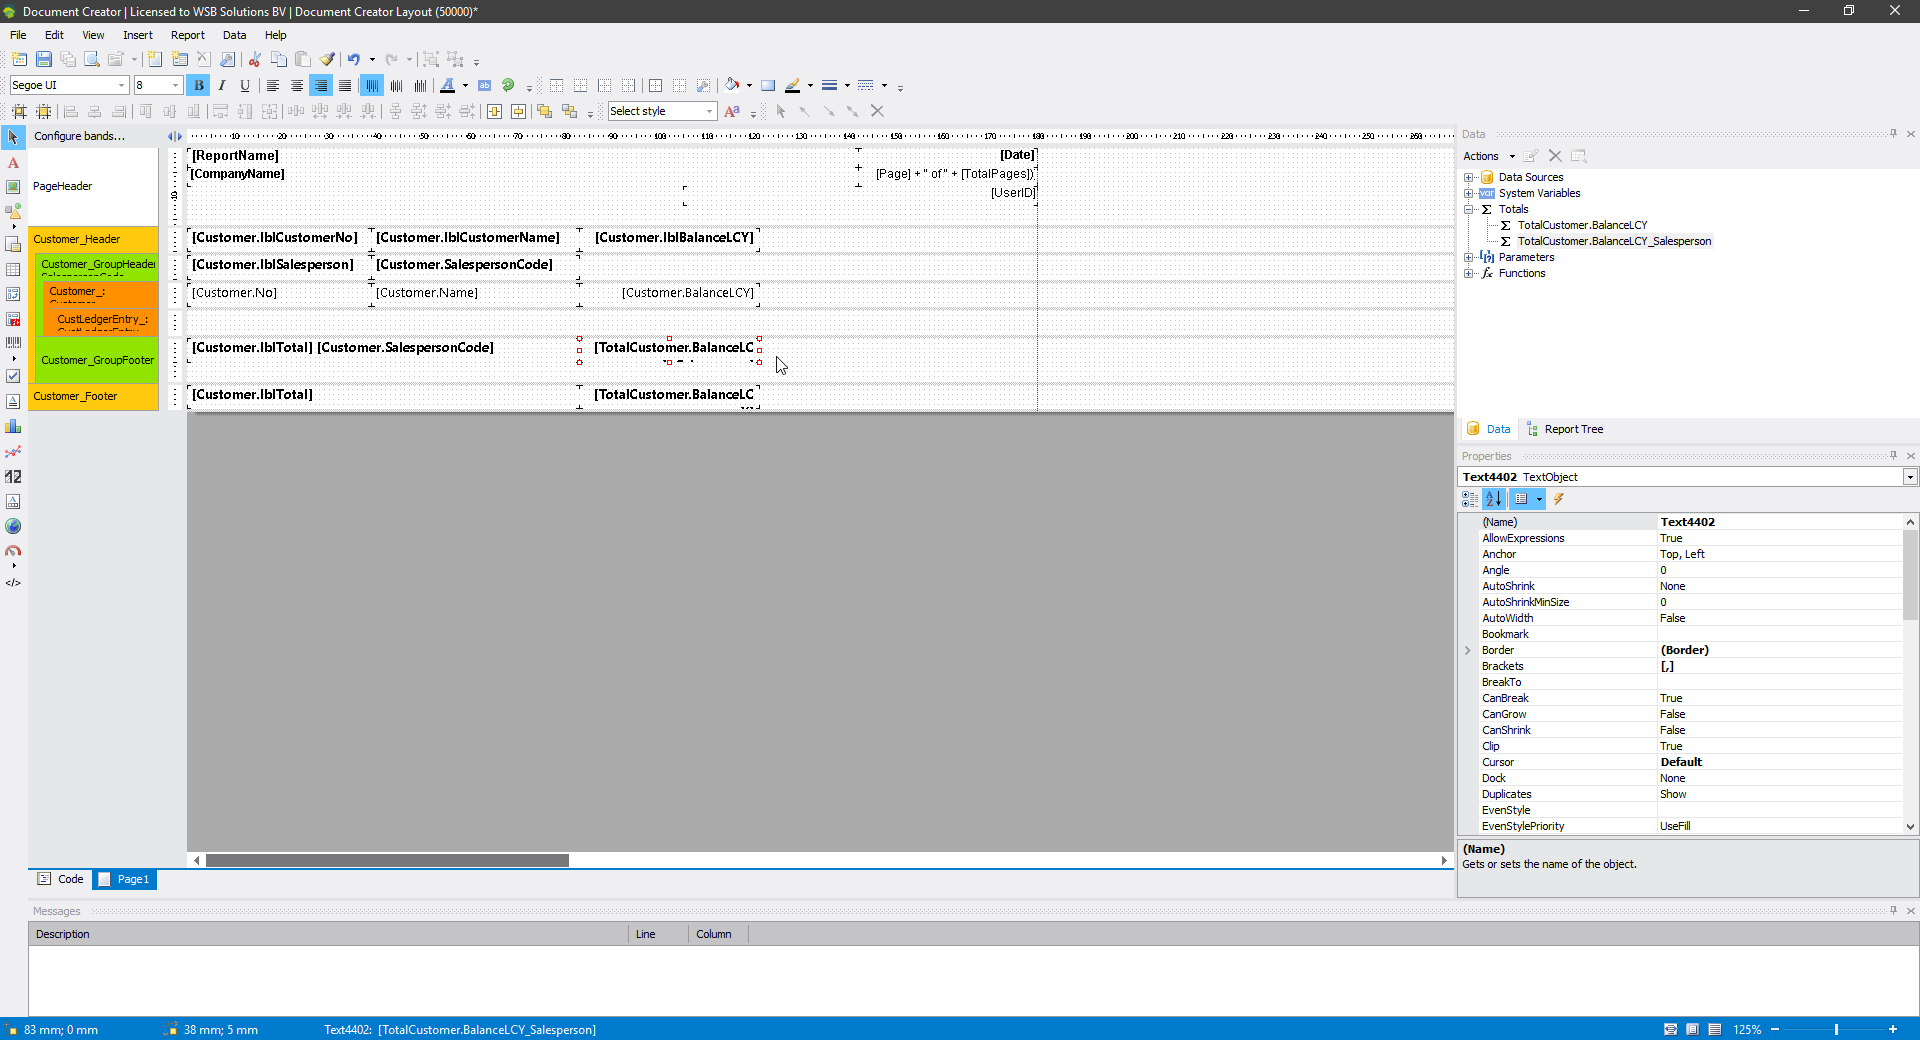
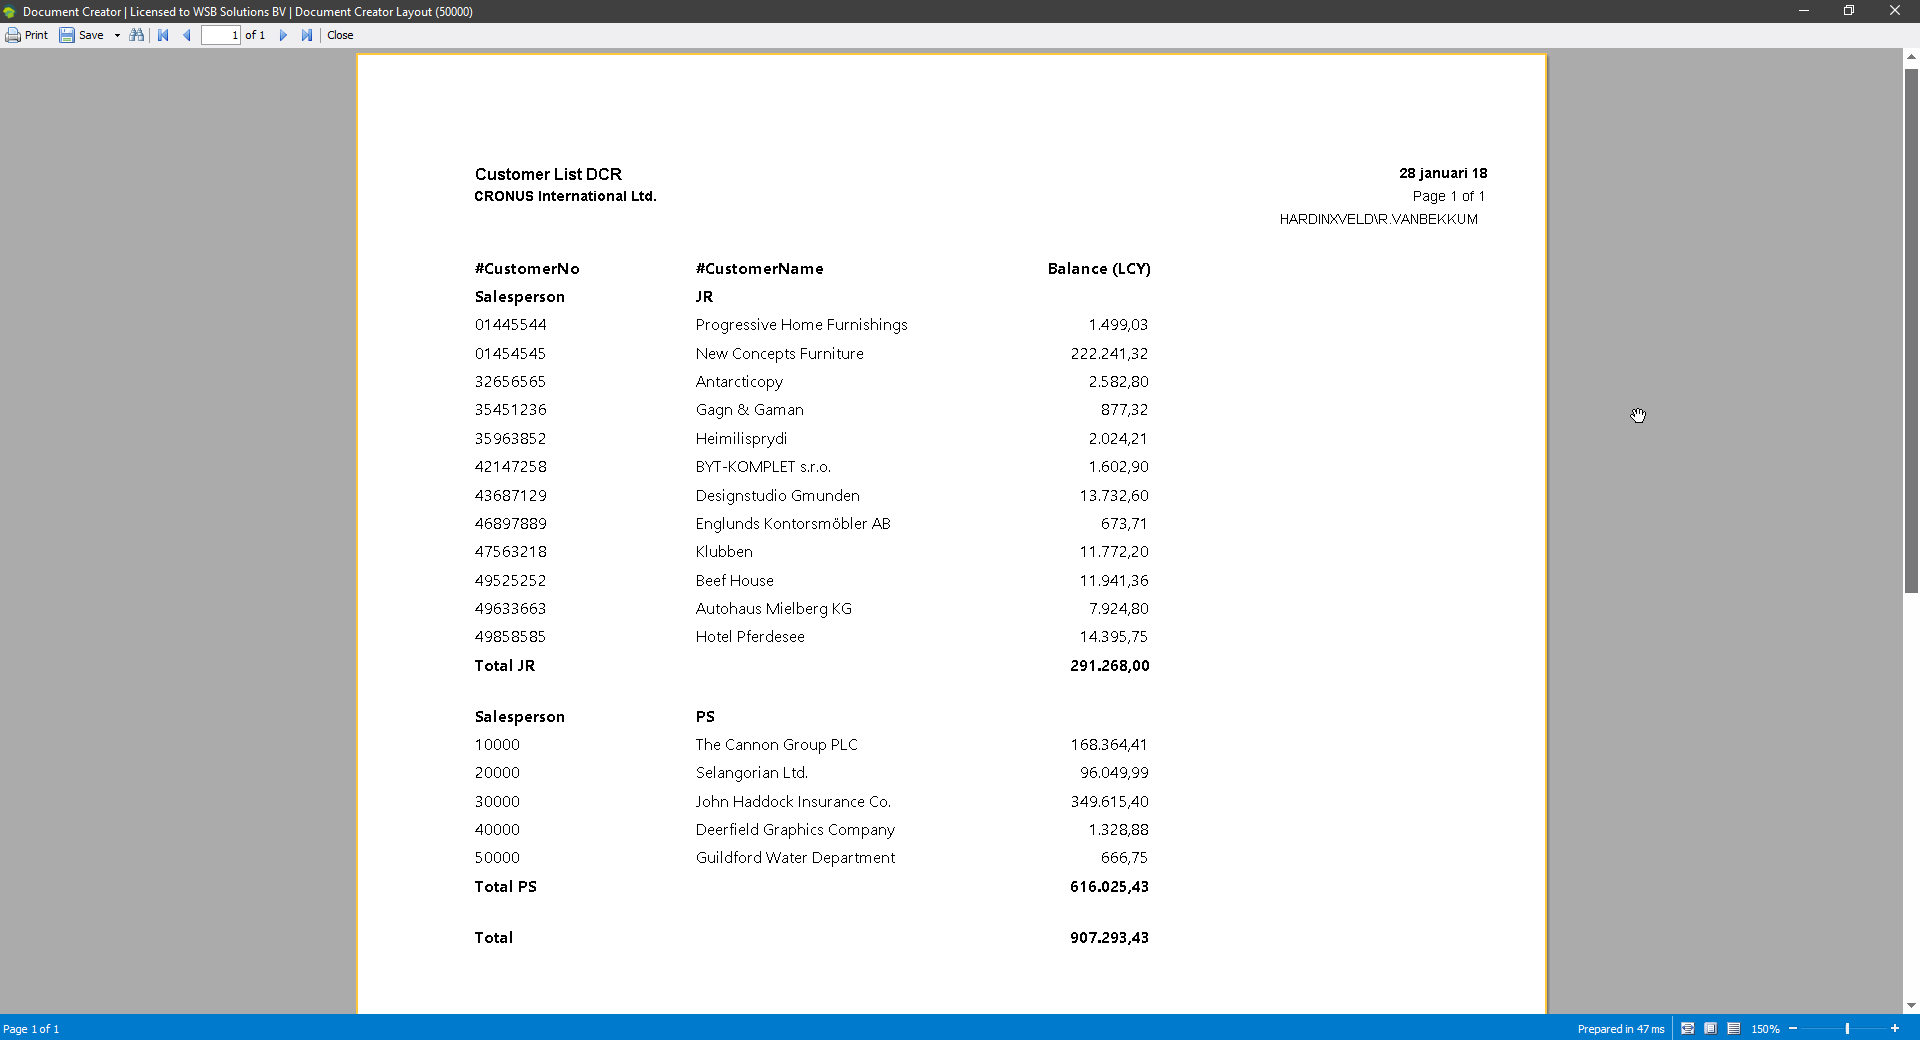
Step 4: Finalizing the layout
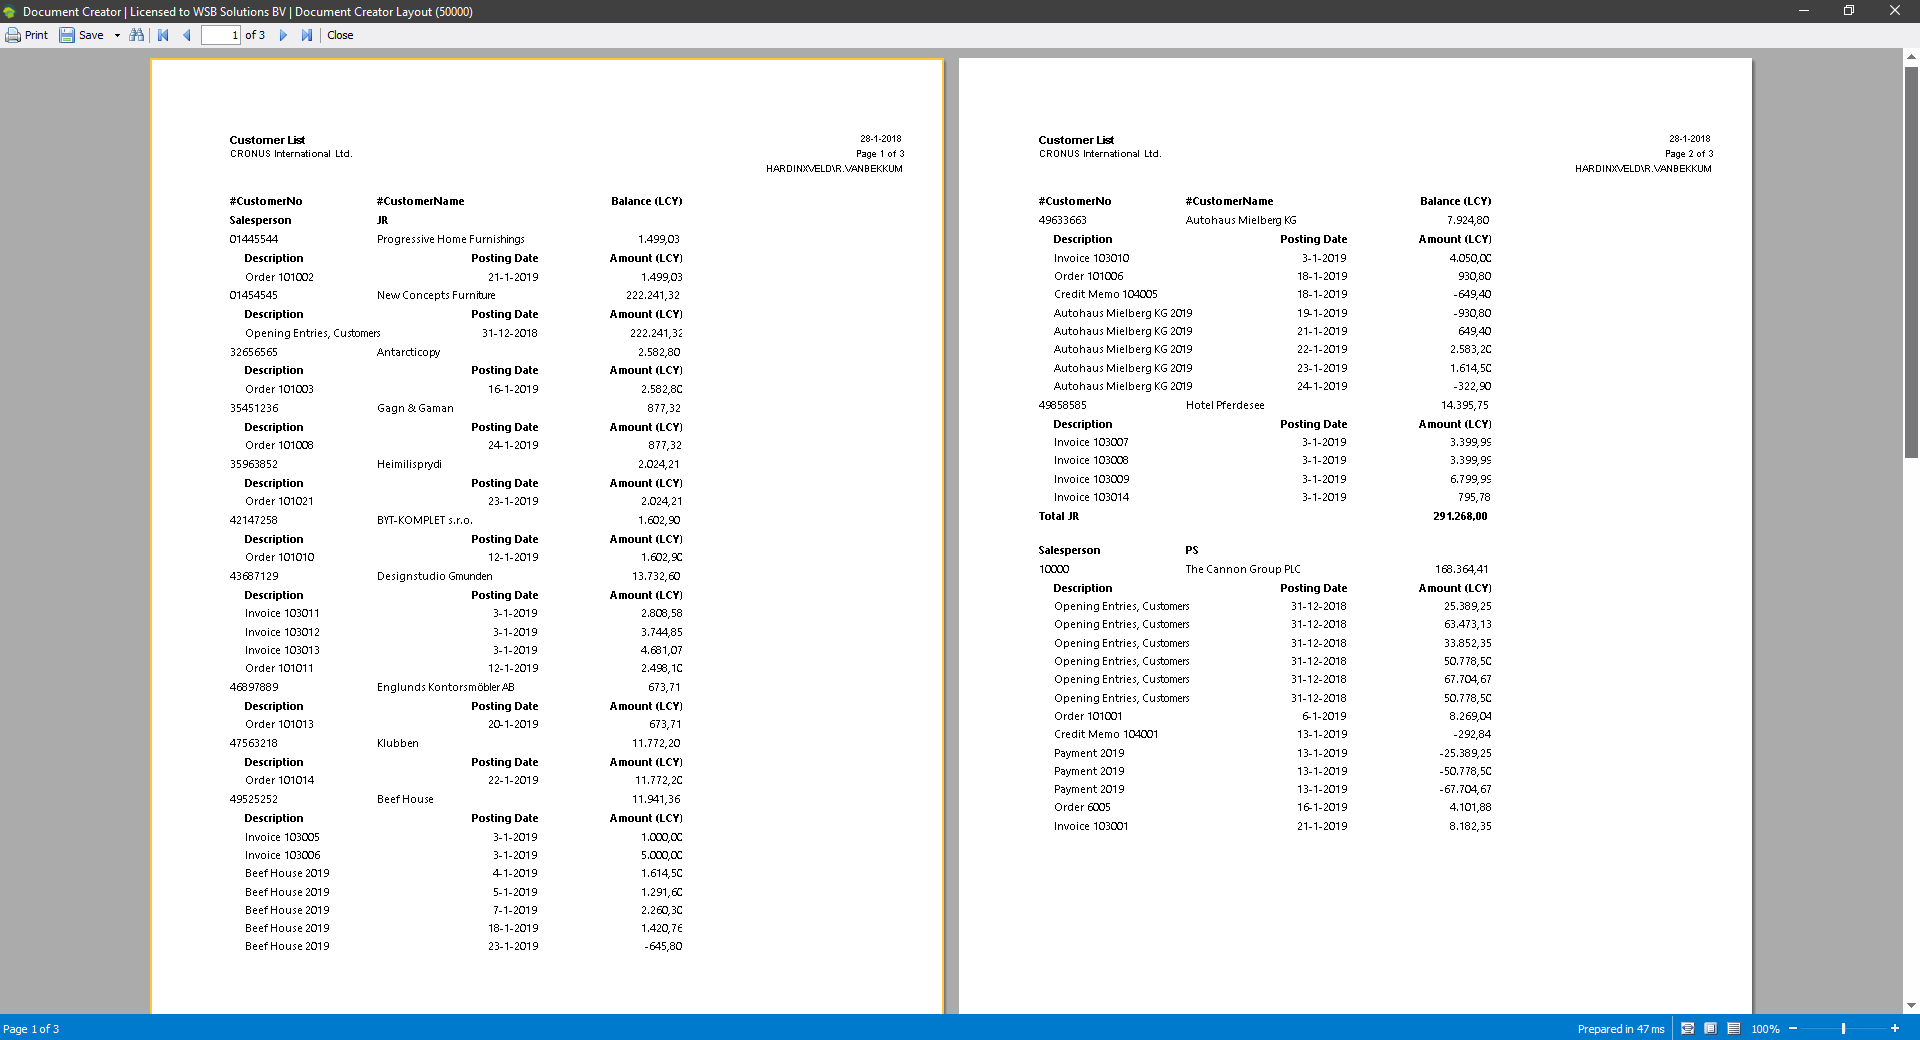
Now our report layout is almost ready. We can make some final changes, for example, adding the customer ledger entries for each of the customers in our report dataset. For this, we add fields from the “CustomerLedgerEntry” datasource to the “CustomerLedgerEntry_” databand to display the data, and add a new header band with the corresponding labels on it. The final report layout and a preview of the output will look as shown in the screenshots below:

Configuring Report Layout Selections
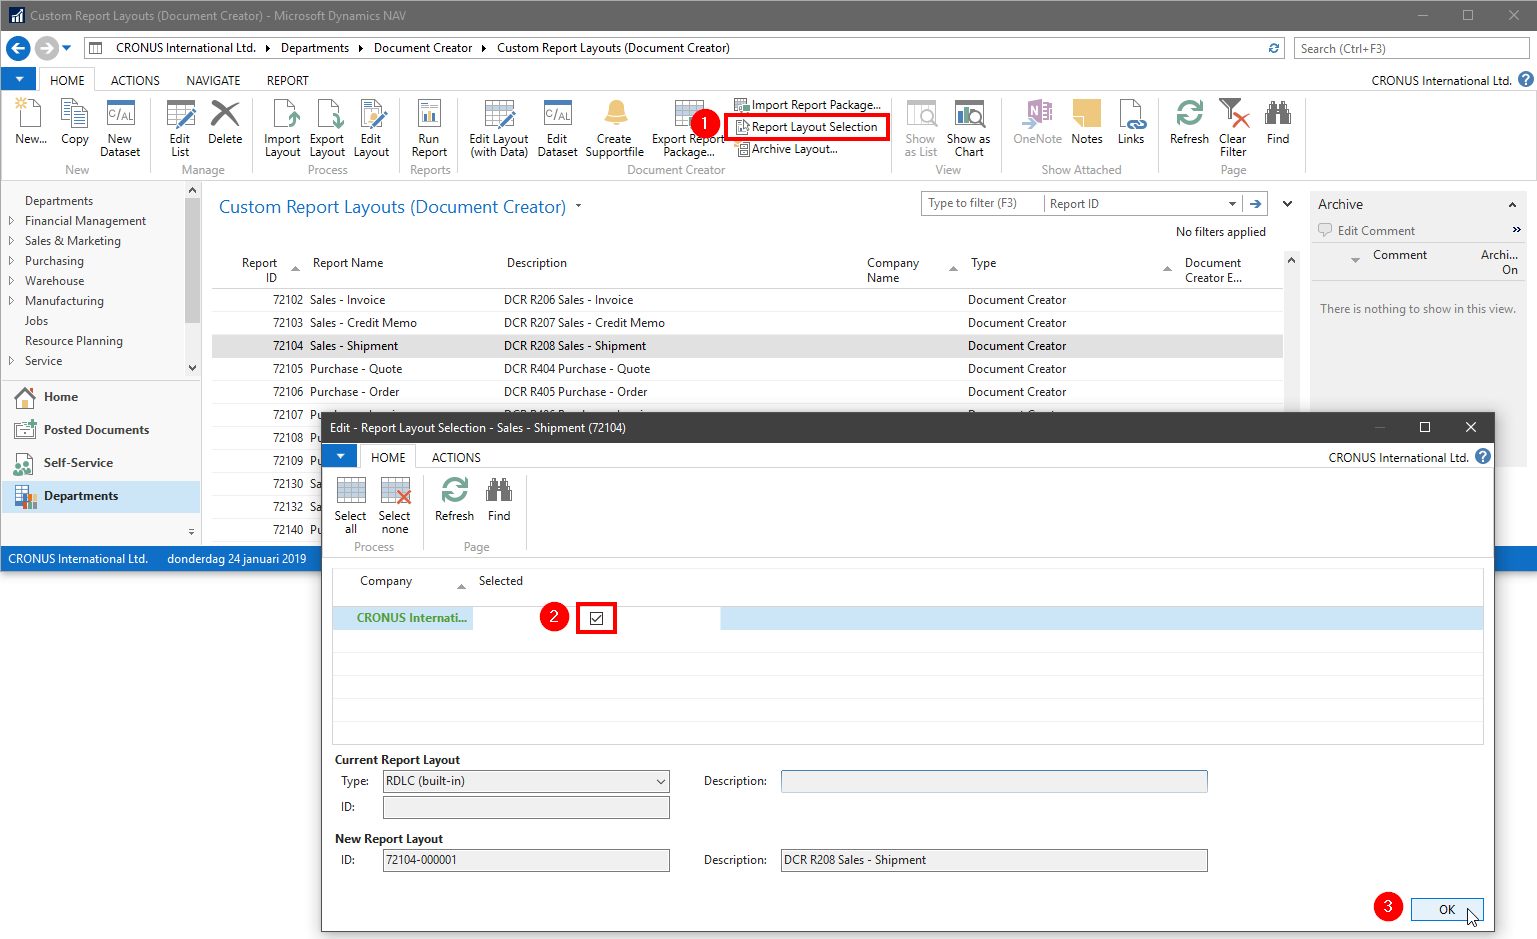
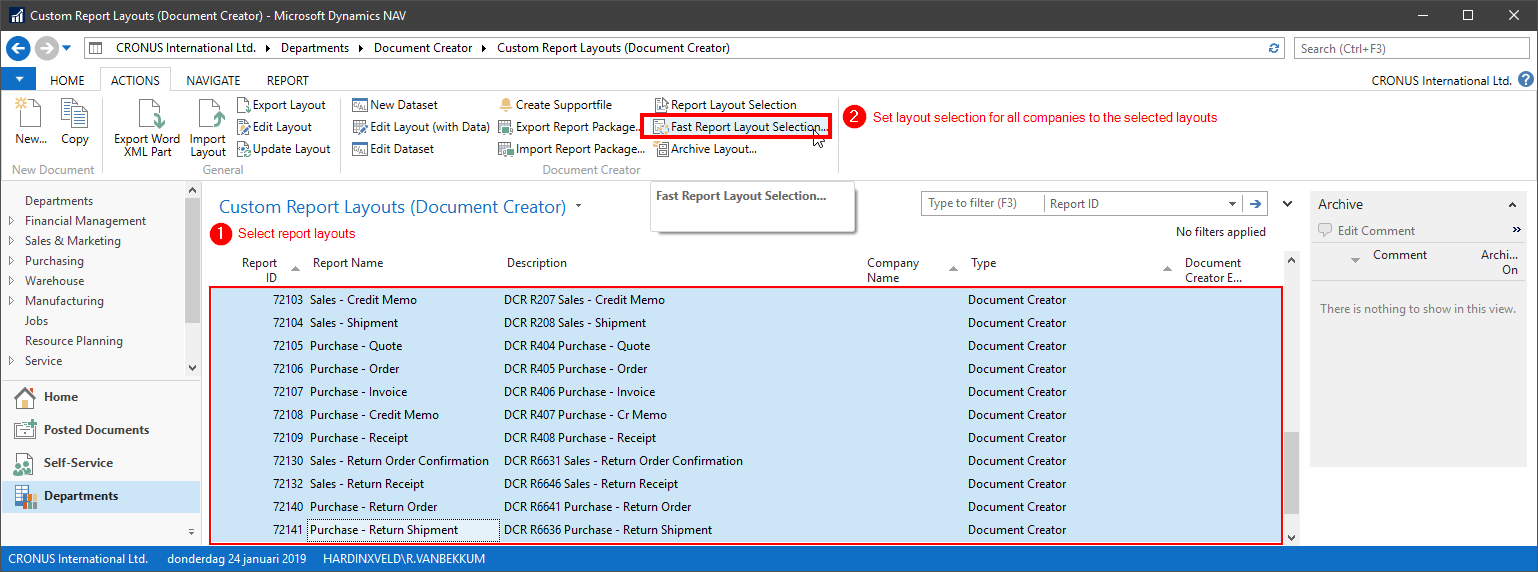
By default, the RDLC layout defined in the C/SIDE report object will be used, which means that we have to take some final action to change this so that the report will use our custom Document Creator layout. You can easily change the layout selections by selecting the “Report Layout Selection” button at the top of the “Custom Report Layouts” page, where you can change the layout selection for a single report from the “RDLC (built-in)” layout to your custom layout. To change the layout selection for multiple/all reports, you can select the report layouts in the “Custom Report Layouts” page and then press the “Fast Report Layout Selection…” button to change the layout selection automatically for all companies to the selected Document Creator report layouts.
This hopefully shows you how easy it is to create report layouts from scratch in Document Creator. Of course, there is no need to start from scratch for every report, as you can easily adapt the provided templates to your needs for the most frequently used reports. If you want to explore Document Creator yourself, you can check out the latest demo available at www.document-creator.com/downloads.